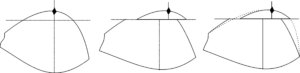
If the bra you made seems to push your breasts in an east/west direction instead of straight ahead, you might want to move the apex of the bra cup to create the illusion of a more forward appearance. In this drawing, I’ve exaggerated the difference between what may be happening in your bra and the look you would prefer to have (shown in grey) but you get the idea. Is there any way we can move the apex on your bra cup? Yes, there is!

First of all, why does this happen to some bra-makers and not others? It may be that you used a fabric with more stretch than the designer recommends, and the fabric itself is allowing the bra cup to take the path of least resistance (which is always outward and downward). But the most common reason is that the breasts are larger than the front frame measurement would suggest. That almost always causes the breast to appear to be facing outward, since there isn’t as much room across the front frame as there would be on a larger body. Here’s a quick tip – if your BCD (Bottom Cup Depth) measurement multiplied by 2 is equal to or less than your desired apex spread (distance between the bust points), your bust points will appear to be looking straight ahead. In other words, if your BCD is 4.25 then your apex spread should be 8.5 or less. If your BCD is 5.0, the apex spread is expected to be 10″ or less. However, I designed these patterns with the apex 1/2″ closer to the centre front than the “standard”. If your body is small compared to your cup size, then even that reduced apex spread may be too wide for you. You have to move the apex on your bra cup. But not everyone has to move the apex. If the breasts are facing straight ahead, they are where they should be. Leave them alone!
On a single piece lower cup pattern, moving the apex is relatively easy, as I show in The Bra-makers manual Volume 1. Slice off the top inch or so of the lower cup, slide the cut-off top part toward the centre front an amount from .5″ to 1.5″ depending on the size of the cup, and redraw the cross-cup curve. The only caveat in this method is to make sure the new cross cup curve length matches the upper cup seam it will be sewn to. You can do this by measuring the sewing line (not the cutting line) of each piece. Easy and understandable, right?
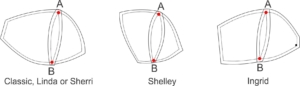
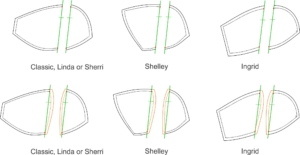
But what about a split lower cup? That’s where the lower cup is in more than one piece. That includes the New Classic, Shelly, Sherri, Linda and Ingrid patterns*. They all have a split lower cup on the larger cup sizes, which is necessary to give the lower cup its shape. That seam falls on the apex. If you’ve made a trial bra, measure the distance from seam to seam (where it touches the upper cup seam) while the bra is on you. Make a note of that distance (for example 9″) Also mark on the cup with a wash-out marker or pins, where you see the apex facing straight ahead. With the bra off, measure the distance between the new mark on one bra cup and the current seam line (for example 1/2″). That 1/2″ will make a total difference of 1″ between your two bust points. Don’t make the mistake of thinking you have to move the apex 1″ on each cup.

STEP 1: Moving the apex on these split cups is not much different than on a single cup above. But…and this is the BIG thing… you must return the split cup back to a single cup piece, move the apex, then split the cup back into two pieces. It’s an extra step in the process. It is not difficult but you must be precise. Here’s how it is done. First, trace off the lower cup pieces (draw the DoGS as they are in the original pattern) and draw sewing lines 1/4″ (6 mm) from all the cutting lines so you know exactly where they are. Put a dot at the corners at both A and B where the cross cup seam and the apex seam meet. Then put the cups together to make a one piece cup, making sure to match the dots at A and B. The pattern will overlap and form an arc shape down the apex seam of the cup. Tape the pieces together. You can trace off this new one piece cup if you wish without the arc shapes along the apex seam – this will keep the lines from getting confusing.
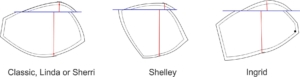
STEP 2: Next, draw a light reference line from point A to point B (shown as a red line). Then, draw a heavier line shown as a blue line down 1″ or less from A, perpendicular to this red reference line. (I’ve tilted the cup to put the red line at 90 degrees to the page.) We only need that first red line to find a true horizontal. In the case of the Shelley patterns, make sure the horizontal slice line does not go below the seam point indicated by the arrow. Before going any further, measure the widest point from the red line to the cutting line on the apex seam. We’ll need that measurement when we draw the new arc.

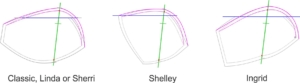
STEP 3: Slice off the top along this blue horizontal line and slide the top piece until the red lines are apart by the needed amount (for example 1/2″). Tape the slice back to the main part of the cups. I have removed the arcs in this drawing as the lines get quite confusing!
STEP 4: Now draw a new apex line from point A to B shown in green. You will notice it does not follow along the original red line from A to B (that’s why I had you draw it in lightly the first time) Mark a match line about 1/3 of the way down the green line. We’ll use that to make our notches later.
STEP 5: Now, finally you can finish the draft. Cut along the green line so you have two halves. From the dots at A and B (the sewing line), draw an arc, shown as orange dotted lines) the width of the arc measurement you took back in STEP 1. I like to keep the widest part of the arc above the midpoint of the apex line. If you put the widest part of the arc too low, the bottom of your breast can look like it is bulging…and not in a good way. Add the seam allowances (orange solid lines) to the curves you just drew. As a final check, lay the arc seams together as if you were going to sew them and make sure the notches match up. Correct them if they do not.
*Just so you know, the Jewel series of patterns (Ruby, Sapphire, Amethyst and Diamond) are not prone to the east/west syndrome because I designed these patterns with an apex seam that is closer to the centre front. In fact, on the Jewel series, the cup has been drafted so the seam does not cross the apex at all , giving it a more “seamless” look, especially under t-shirts. This off-set seam draft also makes the breast more rounded in shape.
Your Fairy Bra Mother
Beverly
