
It is with much fanfare and celebration that we announce the arrival of the Classic 2.0 Bra pattern! We’ve worked on this pattern for a long time (it seems like years…) but the wait was worth it.
The Classic 2.0 is the Original Classic bra but with definite upgrades – for starters, we are using the BCD (Bottom Cup Depth) to size these patterns, just like the Jewel Series of patterns and the Ingrid. This means that if the size you make is a little too small, you simply make the next size up. No more “sister sizing”. For more info on our BCD method of sizing, please click here.
We’ve also put ALL the sizes in ONE envelope. That’s right – all 90 sizes (and then some) in one envelope. No more buying a particular size range just to find out you needed the next size up.

As far as the pattern itself goes, we rounded the crown (not as “pointy” as the original), moved the apex in on the larger sizes, moved the strap in on the larger sizes, split the lower cup on sizes 4.75 and up and made up a lace pattern for view 2 and 3. We also took a dart from the side seam so it hugs the body better and laid back the wire line seam a little bit. Those are changes we noticed when teaching.
The Views, the Views!
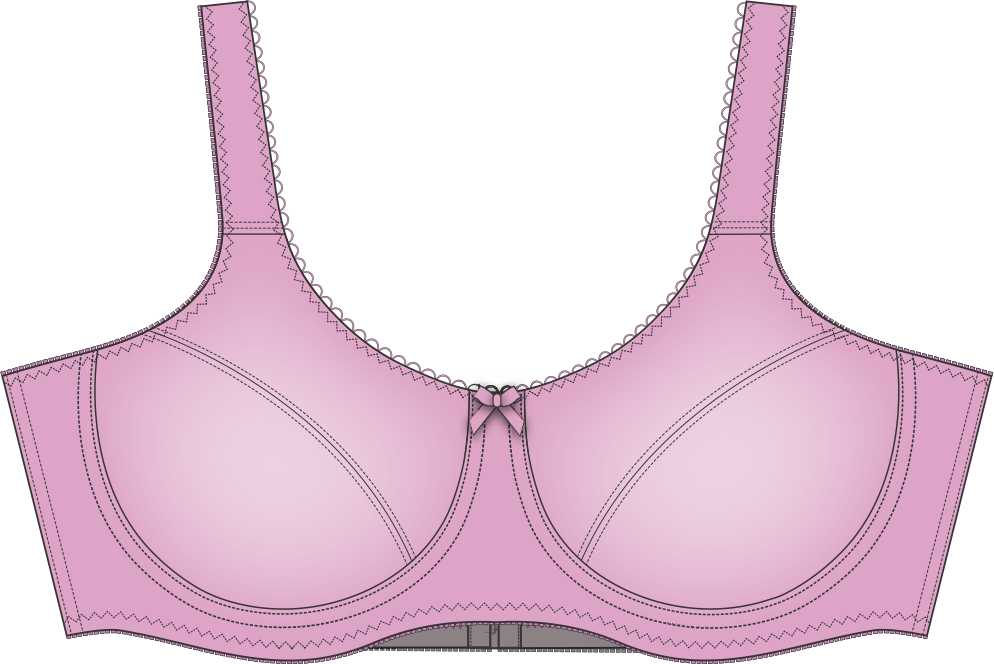
The next thing you will notice is that we added more styles in the Classic 2.0. The original had one view – the new one has FOUR! We offer the original all-fabric view. You will recognize this one – it’s the pattern we recommend for first-time bra-makers and the one we use on the Craftsy class.
View 2 has a lace overlay over the fabric on the upper cup and the strap. This overlay creates a plunge look without the actual plunge. Best of all, it uses such a little bit of lace, you can use up all those odds and ends you’ve been saving (we all save them!)
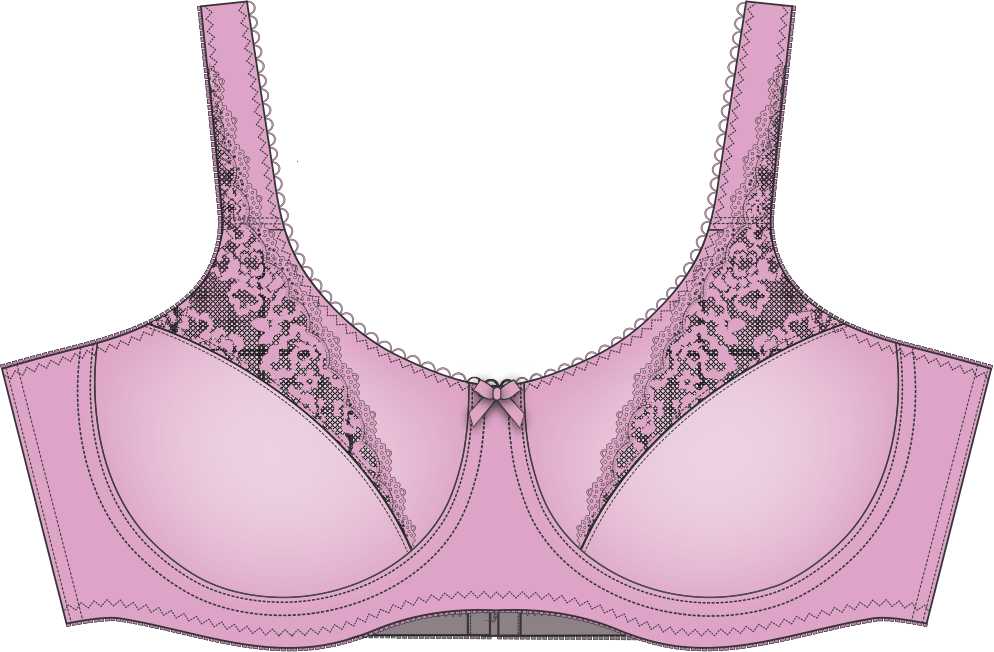
View 3 is a variation of view 2, except that the upper cup is made from sheer cup lining instead of the duoplex we normally use. I have one of these (someone has to test these things) and I love it!
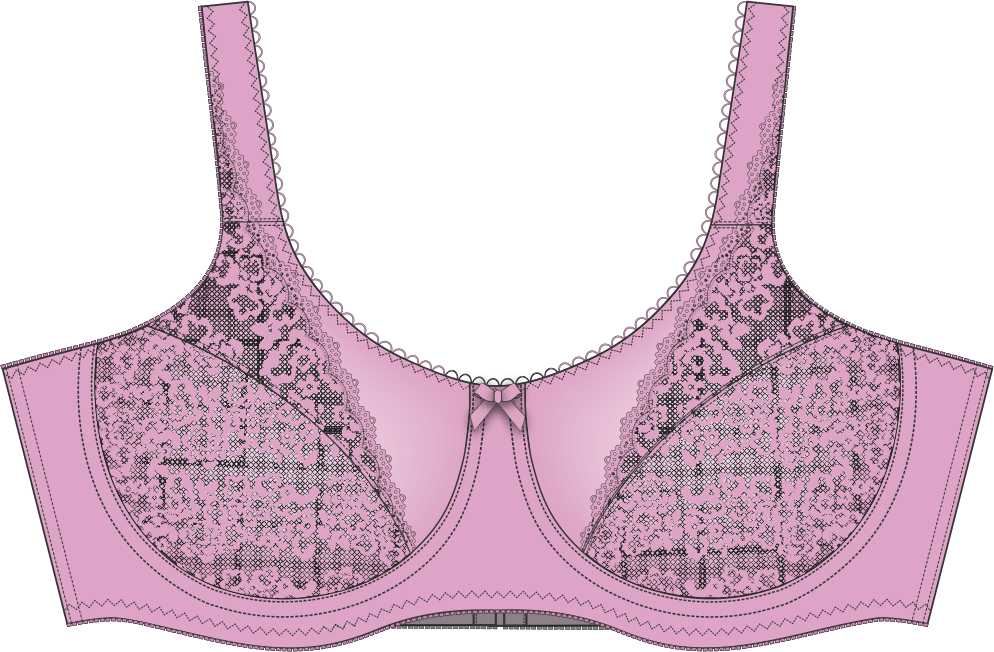
View 4 calls for lace on the lower cup as well as the upper. It is your choice to use sheer cup lining, duoplex or other stable fabric for the lower cup of this view of the Classic 2.0.
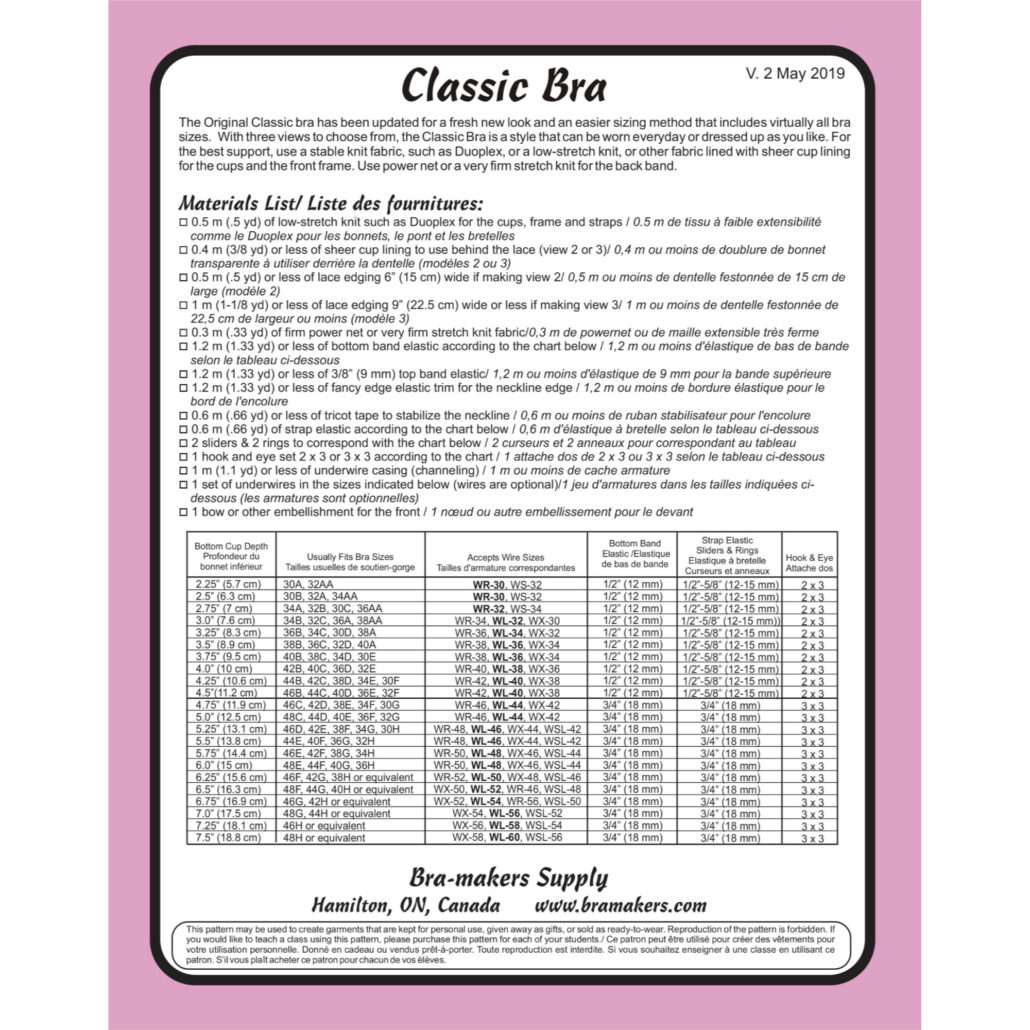
Lastly, the Classic 2.0 has a new and improved back cover with a more user-friendly materials list. Here you can find a chart with all the BCD sizes of this pattern, their ready-to-wear equivalents and the sizes for the findings as well as the wires. All on one convenient chart. The wire sizes shown use three or four different wire sizes, so you will know exactly which one to buy if you are a wire size different than the “standard” (shown in bold lettering)
All these improvements and upgrades make the Classic 2.0 worthy of its place in our pattern library. To that we say Ta Da!


Hello!
I’ve just purchased the Classic Bra V.2 and have watched all your Craftsy classes – ready to make my first bra. Just one very quick question, what is the elastic allowance on the neckline edge?
Kasia
The elastic allowance is always the same as the width of the elastic. In the case of the neckline, it is either 1/4″ or 3/8″ depending on which neckline trim you use.
Aloha, I’m 99.9% finished with my first Classic 2.0, however I don’t see in the directions on how to figure out the length of the adjustable shoulder elastic which attaches back to the shoulder straps. Any info would be greatly appreciated.
Mahalo
10-12″ each should do the trick!
purchased the new 2.0 and have reviewed all your Craftsy classes. Need help enlarging pattern as my upper chest measurement is 49 and pattern only goes to 40. Also BSD is 4.5 inches. Help!
In the new Classic, you measure your rib cage, not the upper bust. If the back band needs lengthening, you can make a vertical cut between the strap attachment point in the back and the side seam. Cut straight down parallel to the DoGS line. Spread the two pieces apart half of the distance you need to cover. If the back band is 4″ too small, spread the pieces 2″ apart. Tape them back together with paper in between aligning the two parts of the DoGS lines. Blend the top and bottom edges so they are each a smooth line
Is the bcd sizing the only change that differs the new from the old version?
I own the Shelley, Linda and Classic old versions and all Beverly Johnson Craftsy classes.
So do I need the updates?
Kind regards
Ruth Rich
I also corrected the cross cup seam dart that so many women seemed to need. If you have a bra pattern that fits you, there is no need to buy the update.
There, I just saved you $60 – but now you could buy the Ruby, Sapphire, Amethyst and Ingrid if you want now!
I signed up for the Craftsy class over a year ago and bought the Classic pattern (blue size range) and made a bra, it looked nice but didn’t fit very well. Several months later I took the beginner bra class at the Saskatchewan Stitches Conference (June 2019). All the participants were fitted to determine their bra size but were we fitted using the BCD method or the older method? In between the Craftsy class bra and the one I made at the Conference my weight dropped so it was determined that I needed the pink size range of the Classic bra. That bra fit very well however I lost a few more pounds and my cup size changed. Can I continue to use the Classic bra pattern that I received as part of the materials package for the class last June or are the improvements (especially with regard to ease of fitting) great enough to justify buying the 2.0 version?
I would love this pattern, but I am not able to afford both the pattern and the shipping. Would it be possible to offer this pattern in a downloadable version? That is the way I buy almost all of my patterns now.
I have both patterns and have noticed updates in the instructions. The updated pattern does not reference stretching fabric between “A” and “B” points of the cup, but to stretch the elastic slightly on the back band. In the Fit and Construction class stretch was only applied under the cups. Do the updates to the classic pattern require no stretch to the elastic at “A” and “B” points. Thanks, -Adrienne
I have re-vamped the pattern so it does not need stretching under the cups.
This looks very nice. I already have the original pattern so I doubt I’ll buy the updated, improved version though it does look lovely. I’ll certainly look at the new views for inspiration though and read anything that may be written about it on the blog with interest.
Bonjour.
Where do we order that pattern. I don’t see anywhere a push button to buy it. Also, I have all your Craftsy classes, which one goes with your 2.0
Classic pattern? Is it designer techniques?
Thanks
Here’s the link to purchase the Classic 2.0. The best class that uses the Classic all the way through is the Sewing Bras: Construction & Fit class. That’s the first class and the most basic! You can read about BCD sizing in the class materials list.
I am already enrolled in the Craftsy class for Sewing Bras: Construction and Fit. Will this bra pattern go with that class? Thank you.
Elizabeth
Absolutely. Just read the Class materials list for an explanation of the BCD and how to use it.
This is fantastic news!! Thank you! I love the Ingrid because it’s so easy to fit. This will really help!
Awesome!! When Will you guys be offering your patterns in pdf?
Oh…someday…lol
This looks wonderful! Going to order right now. 🙂
Yes please