Cut and Sew Foam – Trimmed Foam
In the second method of making foam cups, the Cut and Sew Foam Trimmed Foam Method, is a little different than treating the fabric and the foam as one layer and sewing it together. In this method, the fabric is cut the same as usual but we use a different cutting plan for the foam. The foam will have the seam allowance (usually 1/4”) trimmed from the cross cup seam (hence the name – trimmed foam). Do not remove the seam allowance from anywhere else except the cross cup seam (the one on the interior of the cup, not the edges) If you have a 3 piece cup, then remove seam allowances from any seam that is on the interior of the cup, but not the perimeter.
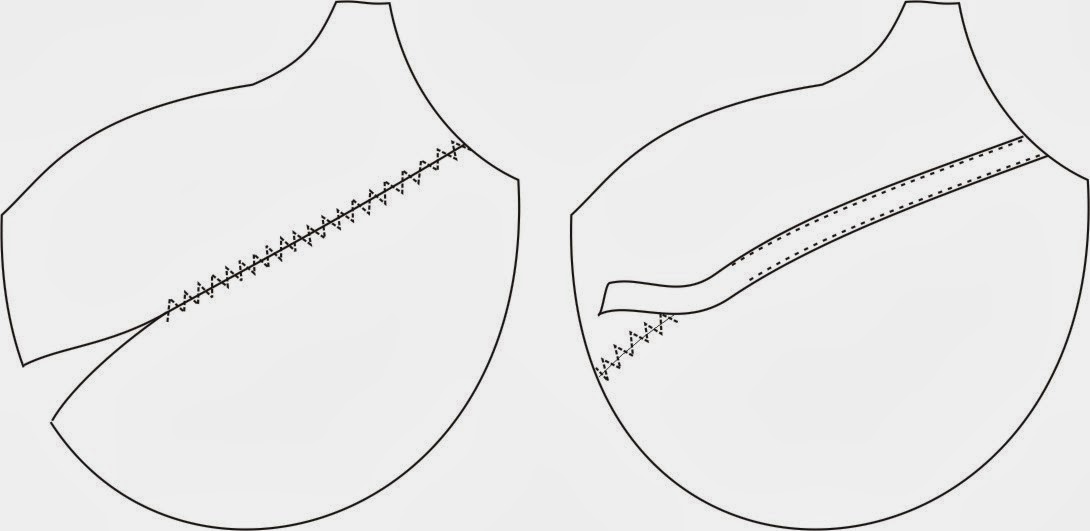
Now butt the edges of the foam together, and use a three-step zig-zag (also called a multi-zigzag or an elastic zigzag) to attach the upper cup to the lower. This bridging stitch that connects the two pieces will lie flat and smooth over the bust when finished. Don’t let the pieces overlap, but don’t let them creep apart, either.
Sew the fashion cup as you usually do, and topstitch. Now put the two layers together, aligning the cross cup seam. You’re going to pin the outside perimeter. But wait! Did you notice something? The fashion fabric has stretch, and the foam really doesn’t. Therefore the fashion fabric is bagging out over the foam cup. What to do?
You will need to pull the fashion fabric (keeping the cross cup seam lined up) so that the fashion fabric stays taut across the entire cup, all the while keeping the cross sup seams aligned. This will cause the fabric cup to be larger than the foam cup, and the extra will be very visible around the perimeter of the foam. If the fabric stretches in both the lengthwise and the crosswise directions, then the assumption is that the extra bit should be fairly even all around the cup. Pin along the perimeter and don’t be afraid to go back to it and tweak it a bit.
At the same time you are pulling fabric taut, you cannot pull the fabric so much that it cups or collapses the foam. This pulling, smoothing and pinning will take several minutes to do properly but believe me, there will be a time that comes, when you can do it in a matter of seconds, once you understand how it is done.
If you are making one bra, the time spent on this will not be an issue. However, if working in ready-to-wear, this is too much time. You will need to make a separate pattern for the fabric cups, based on the size of the fabric cup determined after pinning. In all likelihood, the fabric cup will be reduced by 1/4” or more. I have seen anywhere from 1/8” to 3/8”, and this would come off the cross cup seam. In that way, the perimeter edges all line up the way we intended.


Leave a Reply
Want to join the discussion?Feel free to contribute!