Sew You Want To Make A Bra – The Inside Story by Fit2Sew
Sew You Want To Make A Bra – The Inside Story by Fit2Sew
If you are not happy with the results below please do another search
Sew You Want To Make A Bra – The Inside Story by Fit2Sew
Sew You Want To Make A Bra – What Goes Where? by Fit2Sew
Sew You Want To Make A Bra – Bra Types by Fit2Sew
Sew You Want To Make A Bra – Introduction by Fit2Sew
Sew You Want to Make a Bra – Overview
by Fit2Sew
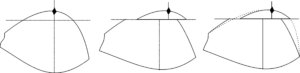
If the bra you made seems to push your breasts in an east/west direction instead of straight ahead, you might want to move the apex of the bra cup to create the illusion of a more forward appearance. In this drawing, I’ve exaggerated the difference between what may be happening in your bra and the look you would prefer to have (shown in grey) but you get the idea. Is there any way we can move the apex on your bra cup? Yes, there is!

First of all, why does this happen to some bra-makers and not others? It may be that you used a fabric with more stretch than the designer recommends, and the fabric itself is allowing the bra cup to take the path of least resistance (which is always outward and downward). But the most common reason is that the breasts are larger than the front frame measurement would suggest. That almost always causes the breast to appear to be facing outward, since there isn’t as much room across the front frame as there would be on a larger body. Here’s a quick tip – if your BCD (Bottom Cup Depth) measurement multiplied by 2 is equal to or less than your desired apex spread (distance between the bust points), your bust points will appear to be looking straight ahead. In other words, if your BCD is 4.25 then your apex spread should be 8.5 or less. If your BCD is 5.0, the apex spread is expected to be 10″ or less. However, I designed these patterns with the apex 1/2″ closer to the centre front than the “standard”. If your body is small compared to your cup size, then even that reduced apex spread may be too wide for you. You have to move the apex on your bra cup. But not everyone has to move the apex. If the breasts are facing straight ahead, they are where they should be. Leave them alone!
On a single piece lower cup pattern, moving the apex is relatively easy, as I show in The Bra-makers manual Volume 1. Slice off the top inch or so of the lower cup, slide the cut-off top part toward the centre front an amount from .5″ to 1.5″ depending on the size of the cup, and redraw the cross-cup curve. The only caveat in this method is to make sure the new cross cup curve length matches the upper cup seam it will be sewn to. You can do this by measuring the sewing line (not the cutting line) of each piece. Easy and understandable, right?
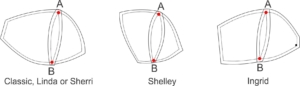
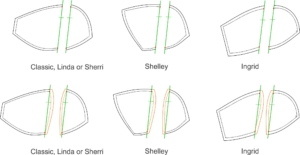
But what about a split lower cup? That’s where the lower cup is in more than one piece. That includes the New Classic, Shelly, Sherri, Linda and Ingrid patterns*. They all have a split lower cup on the larger cup sizes, which is necessary to give the lower cup its shape. That seam falls on the apex. If you’ve made a trial bra, measure the distance from seam to seam (where it touches the upper cup seam) while the bra is on you. Make a note of that distance (for example 9″) Also mark on the cup with a wash-out marker or pins, where you see the apex facing straight ahead. With the bra off, measure the distance between the new mark on one bra cup and the current seam line (for example 1/2″). That 1/2″ will make a total difference of 1″ between your two bust points. Don’t make the mistake of thinking you have to move the apex 1″ on each cup.

STEP 1: Moving the apex on these split cups is not much different than on a single cup above. But…and this is the BIG thing… you must return the split cup back to a single cup piece, move the apex, then split the cup back into two pieces. It’s an extra step in the process. It is not difficult but you must be precise. Here’s how it is done. First, trace off the lower cup pieces (draw the DoGS as they are in the original pattern) and draw sewing lines 1/4″ (6 mm) from all the cutting lines so you know exactly where they are. Put a dot at the corners at both A and B where the cross cup seam and the apex seam meet. Then put the cups together to make a one piece cup, making sure to match the dots at A and B. The pattern will overlap and form an arc shape down the apex seam of the cup. Tape the pieces together. You can trace off this new one piece cup if you wish without the arc shapes along the apex seam – this will keep the lines from getting confusing.
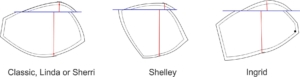
STEP 2: Next, draw a light reference line from point A to point B (shown as a red line). Then, draw a heavier line shown as a blue line down 1″ or less from A, perpendicular to this red reference line. (I’ve tilted the cup to put the red line at 90 degrees to the page.) We only need that first red line to find a true horizontal. In the case of the Shelley patterns, make sure the horizontal slice line does not go below the seam point indicated by the arrow. Before going any further, measure the widest point from the red line to the cutting line on the apex seam. We’ll need that measurement when we draw the new arc.

STEP 3: Slice off the top along this blue horizontal line and slide the top piece until the red lines are apart by the needed amount (for example 1/2″). Tape the slice back to the main part of the cups. I have removed the arcs in this drawing as the lines get quite confusing!
STEP 4: Now draw a new apex line from point A to B shown in green. You will notice it does not follow along the original red line from A to B (that’s why I had you draw it in lightly the first time) Mark a match line about 1/3 of the way down the green line. We’ll use that to make our notches later.
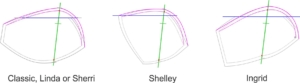
STEP 5: Now, finally you can finish the draft. Cut along the green line so you have two halves. From the dots at A and B (the sewing line), draw an arc, shown as orange dotted lines) the width of the arc measurement you took back in STEP 1. I like to keep the widest part of the arc above the midpoint of the apex line. If you put the widest part of the arc too low, the bottom of your breast can look like it is bulging…and not in a good way. Add the seam allowances (orange solid lines) to the curves you just drew. As a final check, lay the arc seams together as if you were going to sew them and make sure the notches match up. Correct them if they do not.
*Just so you know, the Jewel series of patterns (Ruby, Sapphire, Amethyst and Diamond) are not prone to the east/west syndrome because I designed these patterns with an apex seam that is closer to the centre front. In fact, on the Jewel series, the cup has been drafted so the seam does not cross the apex at all , giving it a more “seamless” look, especially under t-shirts. This off-set seam draft also makes the breast more rounded in shape.
Your Fairy Bra Mother
Beverly
Our Single Bra Kits include all of the basic materials to make one bra, conveniently cut and packaged – without the guesswork. The Single Bra Kit is perfect for the first-time bra-maker or for bra-making teachers.
Now we have our Brand New Duo Kits! The fabric remains the same but we are offering so many more options! Get your Duoplex and Power Net with a coordinating colour, or an Ingrid Findings Kit instead! The Duo Bra Kits offer you so much more choice and customization when choosing your kits!
SKU#KS-1/KS-2
We now have made your bra making supply shopping easier with our new Duo Bra Kit. Our Duo Bra Kit includes all of the basic materials to make one bra, conveniently cut and packaged with two new options. You can choose one of four different findings kits with the option of it being the same or a contrast colour to the fabric. The Kit is perfect for the first-time bra-maker or for bra-making teachers.
SKU#KD-1/KD-2
Customers enrolled in the Craftsy class – Sewing Bras: Construction & Fit can purchase the pattern and all of the required materials here, all pre-cut, in one convenient package! Don’t forget to let us know your underwire size for the free underwire that is included with the Craftsy Kit.
SKU#KB-023
Our Jewel Findings Kit offers an easy solution to purchasing all of the findings you need to make a bra based on our Ruby Full Band Bra Pattern, Sapphire Partial Band Bra Pattern, or Amethyst Bra Pattern.
Our Bra Findings Kit offers an easy solution to purchasing all of the findings you need to make 1 bra, conveniently cut and packaged – without the guesswork. The Kit is perfect for the first-time bra-maker or for bra-making teachers.
SKU#KF-12/KF-34
Our Ingrid Non-wired Findings Kit offers an easy solution to purchasing all of the findings you need to make 1 bra based off of our new Ingrid Non-wired Bra Pattern conveniently cut and packaged – without the guesswork.
Our Bralette Findings Kit offers an easy solution to purchasing all of the findings you need to make 1 bralette, conveniently cut and packaged – without the guesswork. The Kit is perfect for the first-time bra-maker or for bra-making teachers and is made for our Sweet Sixteen Bralette pattern
SKU#KFB-1/KFB-2
Stockings are often sold as One Size Fits All, but that’s rarely the case in practice. Especiallywith winter weather on the way its the perfect time to curl up in cozy stockings or readingsocks, and now you’ll be able to draft and see them in any size! If you can bear a little bit of […]
Clover Patchwork Pins (Fine)
Art No. 2507
Needle: Steel
Head: Glass
These fine pins are absolutely the BEST pins ever! 100 pins smoothly passes through cloth with heat resistant glass heads that can be ironed. Packaged in a reusable plastic case that snaps shut. Save the case for beads, bobbins, sequins; all kinds of things.
Clover Silk Pins 2501 with their very fine shaft of 0.5mm diameter will not leave pin marks in fabrics. The head is made of glass and will not melt with the heat of the iron.
SKU: NP-2501
The Quilting Pin features a long and sharp tip suited for quilt works. Heat-resistant glass head suited for ironing. 100 pins/case.
SKU: NP-2508
Bodysuits are all the rage; whether it’s being worn as the main part of a stylish Underwear-As-Outerwear look, used as the base of a Halloween costume, or simply underneath your clothes to bring out your inner Wonder Woman we’ve been seeing Bodysuits as a wardrobe staple since 2014, and they’re not going anywhere. If the […]
Our Plastic Nursing Bra Strap Clips are 2 part clips. One end of the clip has a slot for the cup cover, the other end has two slots – one for the strap and one for the sling inside the cup. 4 colours. ¾” wide.
SKU#CN-8/CN-800
We challenge you this month to sew your version of this iconic swimwear that first made a splash, back in the late 50s and early 60’s. To give you an idea of evolution of swimwear, here’s a great video on the history of swimwear (be aware that body paint is used although the model is […]
In June we are looking at every woman’s version of the Holy Grail- a bra that will hold her up in a strapless dress and make her look her best. The strapless bra first announced its appearance in the late 1940s and it has been the unsung hero of every prom and wedding ever since. […]
In May, according to our theme of Hindsight is 2020, we look back to the era of the petticoat and its little sister – the slip. Their hey-day was from the 1800s right up until the 1980s. You can make petticoats, slips, camisoles, even bra slips in this month’s 2020 Ultimate Bra-maker Challenge. We challenge […]
The Diamond Foam Lined Bustier Pattern is an offset vertically seamed cup with foam lining. This bra can be made with or without straps. Over 100 sizes from BCD 3.0 to BCD 6.0
SKU#PB-1026
We challenged you to sew underwear using inspiration from the last 100 years (or the next 100). With our opportunity this month to stay at home and sew, many of you now have 100 minute-old underwear! Here are the entries to last month’s challenge. Kathleen Whenever I make a new bra I promise myself to […]
Our Jewelry Quality Metal Rings and Sliders are made from real jewelry quality metal, no nickel used. The Rings and Sliders are gold, rose gold, or silver plated. Available in 6 different widths. These items are pre-packaged. Please note that these items are for select stores who wish to sell items that are pre-packaged. If you do not want pre-packaged items, you can find these items here.
SKU#RJPP
Customers making a foam cup bra for the first time love the simple convenience of the Printed Mesh Foam Cup Fabrics Pack! Each pack includes all the fabrics you will need to make a foam cup bra – pre-cut and neatly packaged. As with all of our packs and kits, we cut the supplies very generously, including enough material to make even the largest sized bra in our Pin-Up Girls pattern range. For smaller sizes, you will definitely have leftovers! The Printed Foam Cup Fabric Pack includes Duoplex for the bra frame and the straps, Printed Mesh Fabrics for the cup cover, and Power Net for the back band. When selecting the fabric colour, this would be the Duoplex and Powernet which will be that same colour. Available in 4 prints.
SKU#KBM-34
Our G-Hooks are made from metal with a chip-resistant nylon powder coating. The Nylon Coated Metal G-Hooks are available in a variety of colours and widths. Use our G-Hooks to make beautiful straps for bras or garters for garter belts, corsets, or merriwidows. If you are looking for the 1/4″, 3/8″, or 5/8″ G-Hooks, they are located in our Spring Cleaning Sale!
SKU#GH-251/GH-25100/GH-41/GH-4100/GH-61/GH-6100/GH-82/GH-8200/GH-81/GH-8100
Keep trim in a Waspie. What’s a waspie, you may ask? Think of a waist cincher, which could be as simple as a glorified wide belt to a full on under-the-bust-and-down-to-the-hips-waist-cincher-with-garter-clips-to-hold-up-your-stockings creation. Whew! That’s a lot of hyphens to describe such a tiny garment. Here’s a video on 100 years of Shapewear to give you […]
I prefer to think of my time these days at “I get to stay at home” rather than “I am stuck at home”. That being said, sometimes you have to go out. I get that. You can make a mask for yourself or your loved ones just in case they must go out the door. […]
Here they are – just what you have been asking for – Panty kits pre-packaged to go along with the Craftsy class, Sewing Panties. It’s a complete kit for your sewing pleasure. This kit is made specifically for our Panty Basics pattern which is available separately. If you have taken the Craftsy class and drafted your own pattern, this kit is enough for the drafted version too. You’ll have enough material for one pair for hip sizes 32″-54″ (81-137 cm). Smaller sizes may get two pair from this amount of fabric. This kit includes Rib Knit Stripe Stretch Rayon Fabric or Rib Knit Mini Stripe Stretch Rayon Fabric in your choice of colour
SKU# – KPC-39260
We’ve recently been requested to make panty kits our of our Rio Nylon Spandex Fabric. Here they are – just what you have been asking for – Panty kits pre-packaged to go along with the Craftsy class, Sewing Panties. It’s a complete kit for your sewing pleasure. This kit is made specifically for our Panty Basics pattern which is available separately. If you have taken the Craftsy class and drafted your own pattern, this kit is enough for the drafted version too. You’ll have enough material for one pair for hip sizes 32″-54″ (81-137 cm). Smaller sizes may get two pair from this amount of fabric. The Rio Nylon Spandex Panty Kit is available in 34 striking colours. This kit also includes your choice of either Men’s Underwear Pattern, Veronica Panty Pattern, Betty Boy Shorts Pattern or Cheryl Back Seam Panty Pattern *Lace must be purchased separately*
SKU #KPPR-35353
We’ve recently been requested to make panty kits our of our Rio Nylon Spandex Fabric. Here they are – just what you have been asking for – Panty kits pre-packaged to go along with the Craftsy class, Sewing Panties. It’s a complete kit for your sewing pleasure. This kit is made specifically for our Panty Basics pattern which is available separately. If you have taken the Craftsy class and drafted your own pattern, this kit is enough for the drafted version too. You’ll have enough material for one pair for hip sizes 32″-54″ (81-137 cm). Smaller sizes may get two pair from this amount of fabric. The Rio Nylon Spandex Panty Kit is available in 34 striking colours.
SKU #KPR-35353
You’ll be in Panty Heaven with our Printed Organic Cotton Panty Kit with Pattern! The kit includes warm and cozy Organic cotton fabric and elastics to finish our panty pattern, or to make a pair of your own drafted panties from the Craftsy class.
SKU #RUKP-0326


