Thin is In!


That is…….until I noticed that some very high-end ready-to-wear bras had a very thin band in the area right under the cups. So thin that they appeared to be a partial band bra with no band running under the bust. In other words, the band was so thin that it looked like a partial band bra.
What? You don’t know the difference between a full band and a partial band?
Here’s a comparison of partial vs. full band bras. Here’s the full band bra. You can see there is about 1/2″ – 5/8″ (12-15 mm) of band all across under the cups and under the wire line.

But here is the partial band (or frameless bra) which is always an underwired bra. It’s actually the wires that make this bra work. The back band stops at the cup on the side. There is a separate piece (the bridge) that joins the two cups together. There is no band under the cup. What you see is the cup edge turned under and channeling sewn on to hold the wire. It really cannot curl up because the wire is holding it down.

Lots of women think they are wearing a partial band bra, but upon closer examination, we
discover it is a full band after all. Check your own bra closely, to see whether there really is a band at the bottom. A sure indication of a band is found by turning the bra over to show the inside.
Does the elastic continue all the way across the bottom edge? It doesn’t matter if the elastic is covered partially by the wire channeling, as long as you can see the elastic continuously across the bottom – it is a full band. Does the bra have underwires? If it does not, the bra has to be a full band; only full band (“frame”) bras can exist without wires.
This bra below is a full band, and you can see the picot edge of the elastic is continuous across the bottom edge. This bra looks like a partial band but it is a full band bra.

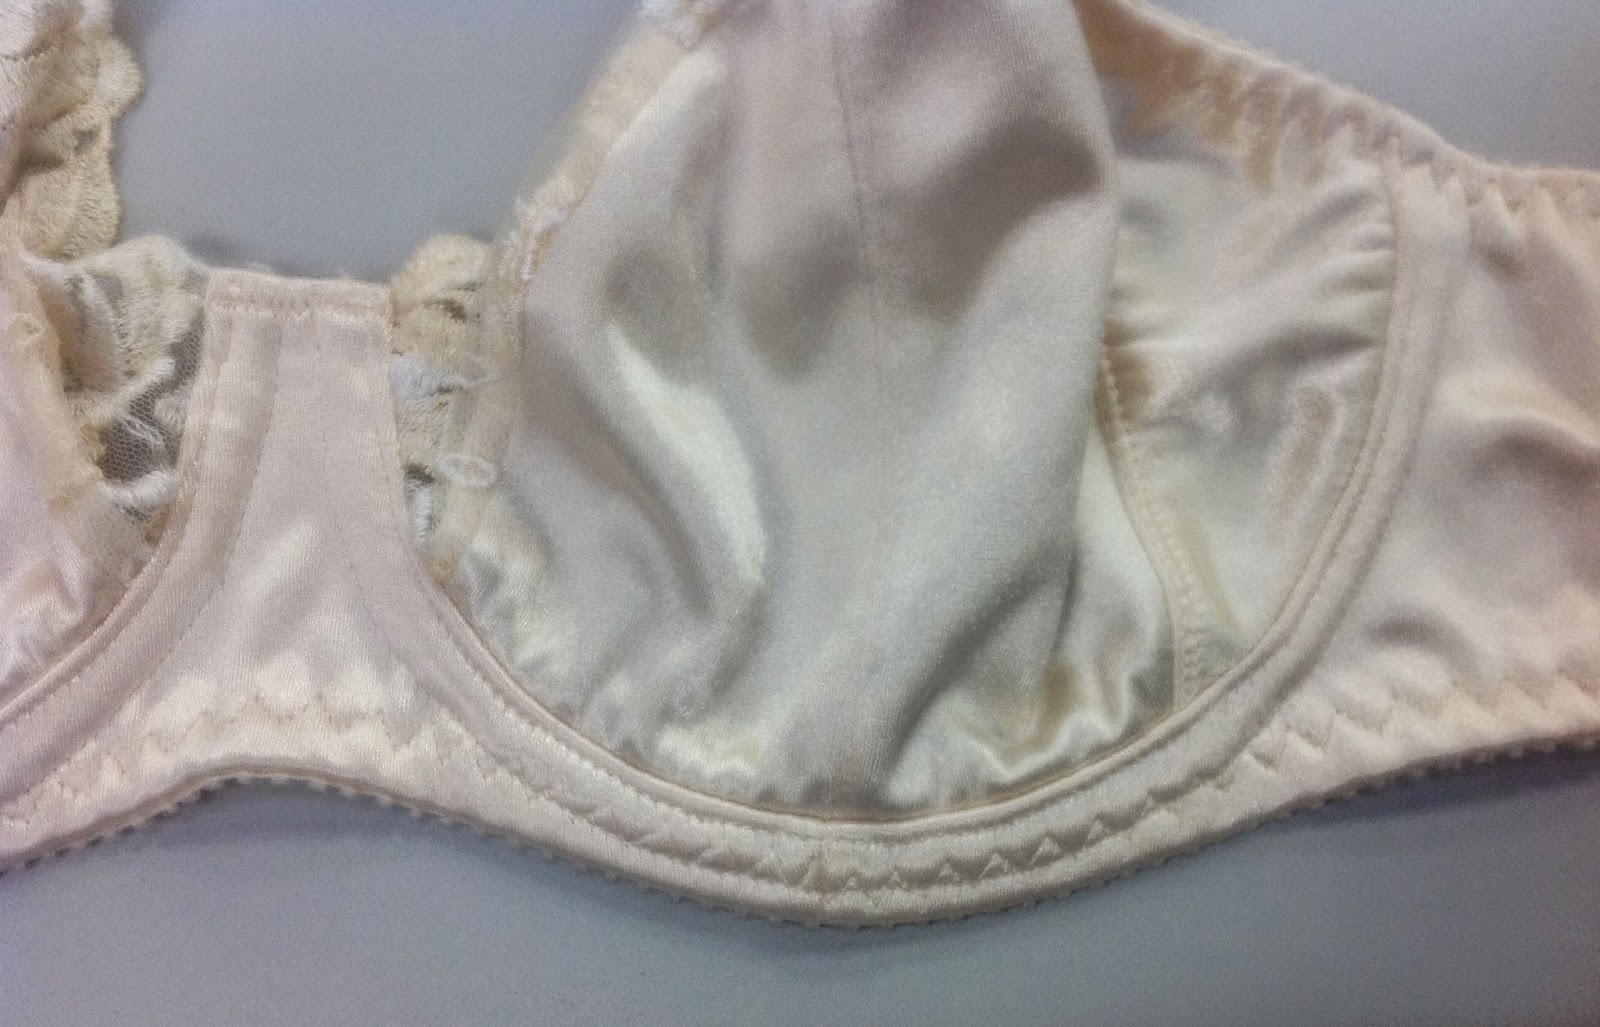
Now take a look at this bra that I made, from the inside. You can hardly see any elastic peeking out from under the channeling, in fact, all you can see are the elastic picots running under the cup. This band has been thinned to its absolute minimum width (the width of the channeling). So where does the elastic go? It certainly looks like it has disappeared. Hint … it’s hidden under the channeling

Ahhh…..watch and learn, my Fairy Bra Children!
On the pattern piece, measure down 3/8″ (10 mm) or the width of the channeling if yours is different – from the seamline of the cup, not the cutting line. Taper from this point under the bust over to the side seam. You may decide to shorten the bridge at the same time. You can see here the pink line is the new sewing line and I decided to raise the bridge a little too.

Add the elastic allowance to the new sewing line, which is equal to the width of the elastic you are using. In my case, that would be 1/2″ (12 mm). here is the new pattern piece showing the new thin area under the cup.

One wee problem…the elastic will now almost always be wider than the space allowed for it in this area. We only allowed 3/8″ (10 mm) and the elastic is 1/2″ (12 mm).
That means the elastic for the bottom band will have to be trimmed a wee bit after the first step of its application in order to lay flat under the wire line seam. You can see the elastic trimmed only in the area where the elastic intrudes into the wire line seam. This area is right at the bottom of the cup.

Trim away only enough elastic to clear the seamline and to allow the channeling to lay flat outside the cup. Do not worry about trimming the elastic! The channeling will roll over the cut edge and cover them completely (as long as you are careful about the trimming and don’t get too scissor-happy!)
When stitching the elastic for the second time, you will have to direct your stitching downward to catch the cut edges. Don’t fuss about this. Strive for evenness in your stitching and the slightly narrower section won’t show.

Here is a different bra that has a thin band. Notice the skinny band under the cup and the topstitching of the wire looks like it stitches right over it. But it doesn’t. This is Bra Magic!
It’s been at least 10 years since I tried this band thinning for myself – now every single bra I make for myself has a thin band. No more curly edges for me!

Thank you for this blog, you are so amazing. Made my first bra about 10 yrs. ago after taking your class at a sewing expo & then got away from making my own, putting up with ill fitting RTW. Purchased the Ruby pattern & Jewel Findings Kit, making a first one in a long time. Needs alterations but still a good start. Looking forward to my latest order arriving.
Howdy! I could һave sworn I’ve been to this blog before but after goіng thгough
many of the posts I realized it’s new to me. Regardless, I’m certainlу
delighted I discovered it and I’ll be book-marking it and
checking back frequently!
I put up posts every Sunday and I love doing tutorials!
Hi Beverly, you directed me here from your Construction and Fit Class. Thank you so much. This all makes sense and I’m gong to try it with my next bra. I have also compared my first Classic with my RTW that fits and have drawn new pieces and have a different underwire. So feeling confident – you are a genius! x
I am glad you found the blog. There is lots of information here you can use, I am sure of it!
Just finished my Shelly bra – it’s perfect and I love it. Next time I’m going to try the thin band as well. You are the best!
Yes, you can. We stock 12 colours of bra components, and they all match our duoplex and power nets very nicely!
The rolling elastic drives me crazy so I will try the thinner band next bra but I ordered the large kits already Beverly…can I buy the 1/2" elastic in the 2 colors I just got from you?
I love this post, Beverly! I refer to it so often. It's a great alteration and makes the bra so much more comfortable without sacrificing the support of the wider elastic and the full band. Thanks!
Michelle
Lots of women don't like partial band bras including me. They just don't sit the same way. Also if someone does not want wires, they have to use a full band
I think I’m discovering this right now. The partial band I made is just not right, the wires are poking my arms, I think the construction makes the wire splay outward. I’m going to take this tutorial and make myself a thin band. Thank you!
Ok, but why not just make partial band bras??
You know, I wasn't going to put in the difference between the two types of bras…then I figured…not everyone who reads this post is familiar with bra-making and all its terminology. So thanks Summer, for confirming that my reckoning was spot on!
I'm wearing a bra that is doing that right now…. so annoying. So thankful for the explanation of the difference between the full band and no band. I love the bra making tips even though I haven't made one … yet.