How to Draft a Garter belt
Garter belts were an essential foundation garment – there were no stay-up stockings, nor had panty hose been invented yet. Putting on a garter belt was an everyday activity. Not today. Garter belts have entered the realm of sexy vintage lingerie. Obviously you want one! I’ve seen many patterns for garter belts but as in all patterns, they might not fit every body. You can draft a pattern to make one in less time than it would go to buy one. Here’s How to Draft a Garter Belt in a simple, vintage style that will fit your unique body shape and measurements.
Let’s Draft!
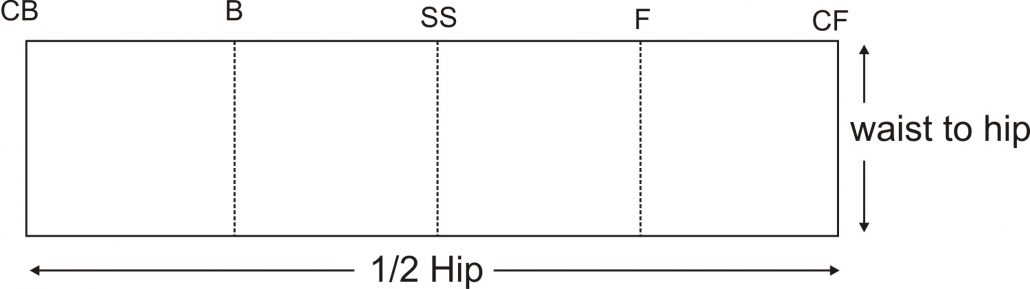
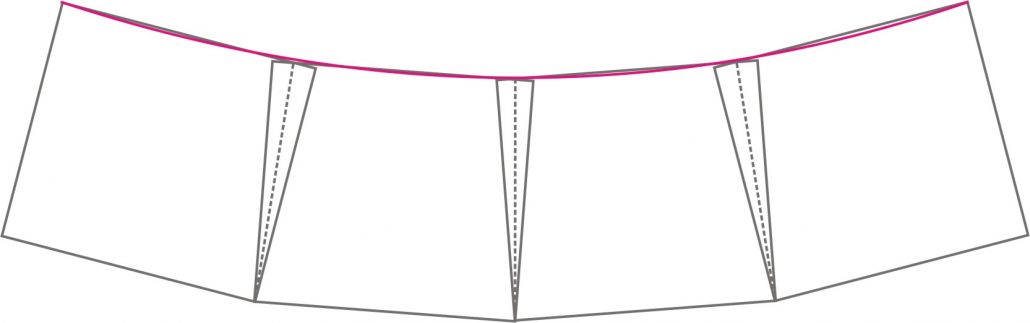
First take your waist and hip measurements, and the distance from your waist to your hip. Draw a rectangle on a piece of paper equal in width to half your hip measurement mark as equal in height to the distance between your waist and hip. If you want your belt below the waist, you can change it later. Mark the right side of the rectangle as Center front and the Left side as Center Back.
Now fold the rectangle in two to find the Side Seam, and in two again between the side seam and the ends to find the position of the garter elastic extensions. Your rectangle will be divided into 4 equal parts.
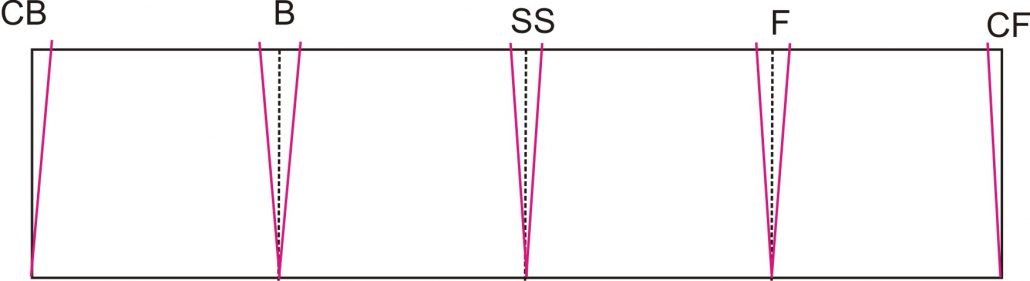
Now to reduce the waist. Subtract your waist measurement (32″) from your hip measurement (40). Divide that measurement by 2 (we are drafting one-half the body so that is 4″) Divide that number by 6. That is the size of each side of the 3 darts we are going to create. For example:
40 – 31 = 9″ and 9/2 = 4.5″ and 4.5/6 – .75″
or for a metric example
100 – 76 = 24 and 24/2 =12 and 12/6 = 2 cm
Mark this distance out from each dotted vertical line. You should have 6 marks in all, each (in my case) .75″ away from the vertical lines.
Connect the 6 marks to the bottom of the vertical lines at the hip line. These are your dart legs.
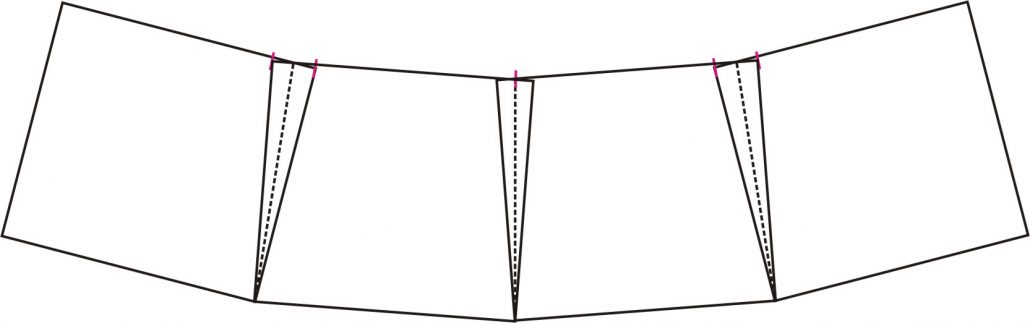
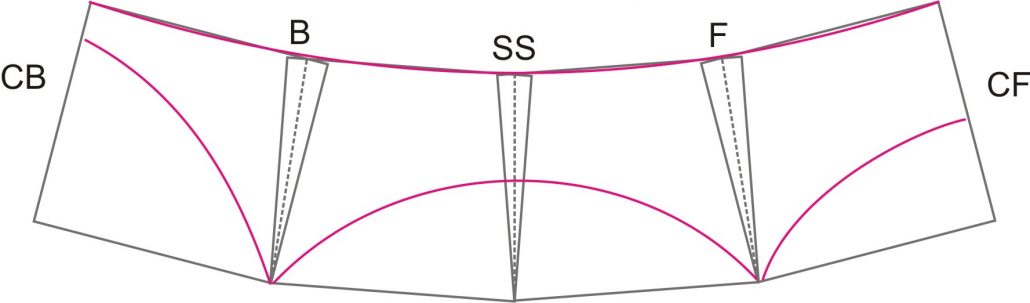
Cut along the black vertical lines B and SS and fold so the pink dart legs align and the darts are closed
Draw a gentle curve along the top line for the waist, keeping as close to the original straight lines as possible.
Draw a curve from the bottom of dart B through the dart at SS to the bottom of dart F as shown. Draw a curve from the bottom of dart F to the CF line, making sure the curve joins the line at a right angle. Finally draw a curve from the bottom of the B dart to the CB line, again meeting the CB line at a right angle. This curved line is higher due to the size of the CB fastener you will be using.
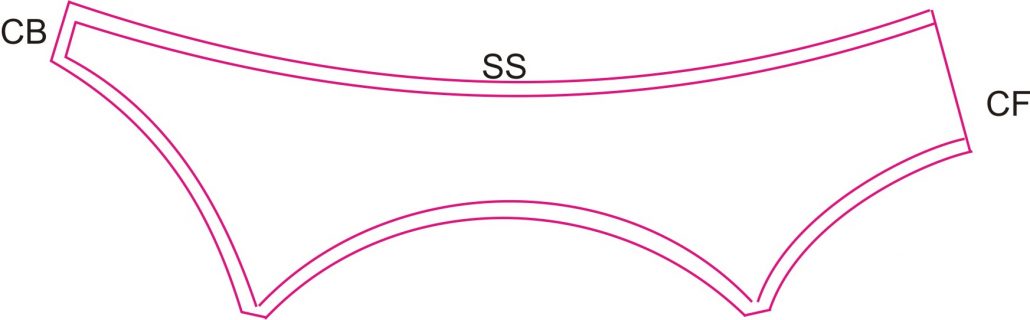
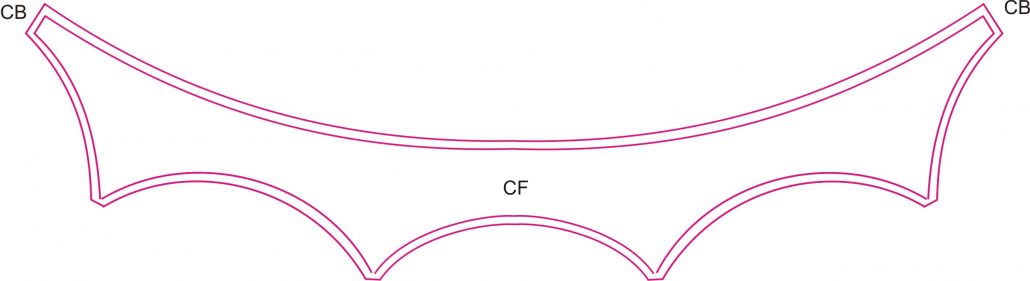
Connect the waist curve and the hip curves with straight lines at CB and CF. Add seam allowances if you are adding trim to the bottom edge or lining the garter belt. Garter belts are often made from woven fabrics, such as silk satin or charmeuse. Depending on the type of fastener you choose, you may have to add some length at the CB.


By hip, do you mean the absolute fullest part of the hip or the bony part of the hip?
Measuring the fullest part of the hip will give you the fit in that area of the garter belt.
Will hip dips affect where I should measure?
Technically you should measure at the widest point – where there will be fabric to cover the area. In other words, if the tops of the legs are larger than the hip 6″ below the waist, but the garter belt doesn’t go down that far on the body, that larger measurement won’t matter because the garter belt does not cover that larger area. Hip dips can be troublesome – so you may want to line the belt with an extra layer so the belt will skim over the dip and appear smooth fitting.
OK, this is going to be an undertaking from what I can see. I apparently am going to have to make one of these by hand. I can half way stitch (20yrs ago in home ec class at least) but now that i want to carry a concealed gun, all the holsters they offer just are NOT going to work for me. So i am out of my element here, but im a DIYer to boot. So, with all that being said, What on earth good sturdy material would i use for this? the holster i know what i want to use, but the material that goes around my waist? Ive never worn one before, but i cant imagine the material is all that sturdy? I mean is it like my bra material? (thats not cotton, its a shiny material). Can anyone fill me on on the material i should use? I imagine the seams/border will have to be folded well over and stitched sturdily to keep up with me. While my body is not slim, and im a big girl, i get into EVERYTHING, and I believe this will the best option for a holster for me, cause everything else is just hard to reach or not sturdy feeling. Between my office job, farming, daily life, construction, believe me when i say i get into everything, and to me a garter girdle seems a legit thing for me to try for where i want it to sit and feel comfortable with it not hitting the ground. So, input on material i should use please?
I think probably coutil, like is used for corsets.
This is a very useful tutorial, but I guess I’m not quite advanced enough yet to take it from here to completion. I can figure out the gist but some of the finishing I’m not so sure about.
You mentioned using woven fabrics for this–would you line it and fold the edges in? Not line it and hem to the inside? Not line it and edge with elastic?
Thank you for sharing this!
Thanks for the tutorial!
One question: what do you do with the (half) darts at front and back? Do you cut them off or leave them?
As the pattern is placed on the fold I would think the latter, but why draw them in then?
I hope you can clarify, thanks in advance for your reply!
Beverley, in a comment above, you say “that’s why we sew our own”. Are you referring to the stockings/hose? If so, can you elaborate on this at all? I am tall and can never find satisfactorily long legs in the stockings. If I could sew my own, that would be amazing!
We have sewn our own stockings using the Ultrafine Stretch Mesh. You have to draft your own using measurements of your leg at the foot, ankle, knee and thigh, as well as the length. It is not difficult but may take you more than once to get the exact fit you like. Bonus – they will always have a retro-looking seam up the back!
Thanks Beverly!! For the seam up the back, do you use a stretch stitch, like the zig-zag, 3 step zig-zag, or the lightning bolt stitch, or are you using a straight stitch? Do you top stitch the seam like in bra cups?
Use a narrow width rolled edge stitch on a serger for best results that stretch. If you don’t have a serger, use a small zig-zag. The other stitches you mention will not have enough stretch to withstand the pulling on of the hose.
Thanks Beverly, I do have a serger. I appreciate your tips!
I’ve used this pattern. You can make tights or stockings and it is really straightforward.
https://sewing.patternreview.com/Patterns/64883?epik=dj0yJnU9WDREaHpIaVB3TzBvWWVnUUkwZi0zd0ctMXZ5bHRLSjImbj00bzAtQUJCNzJ0U3VQdzFneHZBdF9BJm09MyZ0PUFBQUFBRjItRG5v
http://thedreamstress.com/2015/01/tutorial-pattern-making-your-own-seamed-stockings/
Here is a stockings tutorial and a link for their pattern. Just 2 pages to print out. I’ve made several.
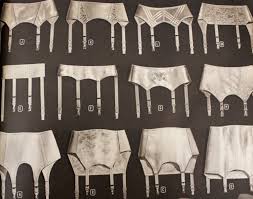
There is another great reason to wear a garter belt and stockings, rather than pantyhose. Some of us are so susceptible to yeast infections that it is a very bad idea to cover the area with anything but pure cotton. When I was in my 20s, I wore garter belts for practical reasons. I do not wear pantyhose or stockings now, but if I did I would have to make a garter belt since the ones available now are intended to be on for about 2 minutes. They are so pitiful I wouldn’t pay 50 cents for them.
The skimpy 4 strap belts are for the bedroom. If you look at garter belt websites, There are robust 6 / 8 / 10 / 14 strap belts which are suited to daily use and will last.
I disagree. I wore many garter belts in high school and university, before the days of pantyhose. I never wore anything more than 4 straps. If spaced correctly, 4 is quite enough, in my opinion.
The problem with the ones in the shops is that they’re meant to be worn by anorexics. They’re too narrow and if you have any flesh on your bones they attempt to cut you in two.
But when you make your own…you can make it to suit your own body type. That is why we sew our own.
Not all skinny girls are anarexic. I buy them from there and sometimes they are too big. Dont be bitter cause skinny girls exist
Well i remember my mother wearing stockings with her girdle with the garter straps. Some of the men that were friends of my father thought she had some “nice” legs. I just liked the feel of those “hose” .