Do-it-yourself Breast Form
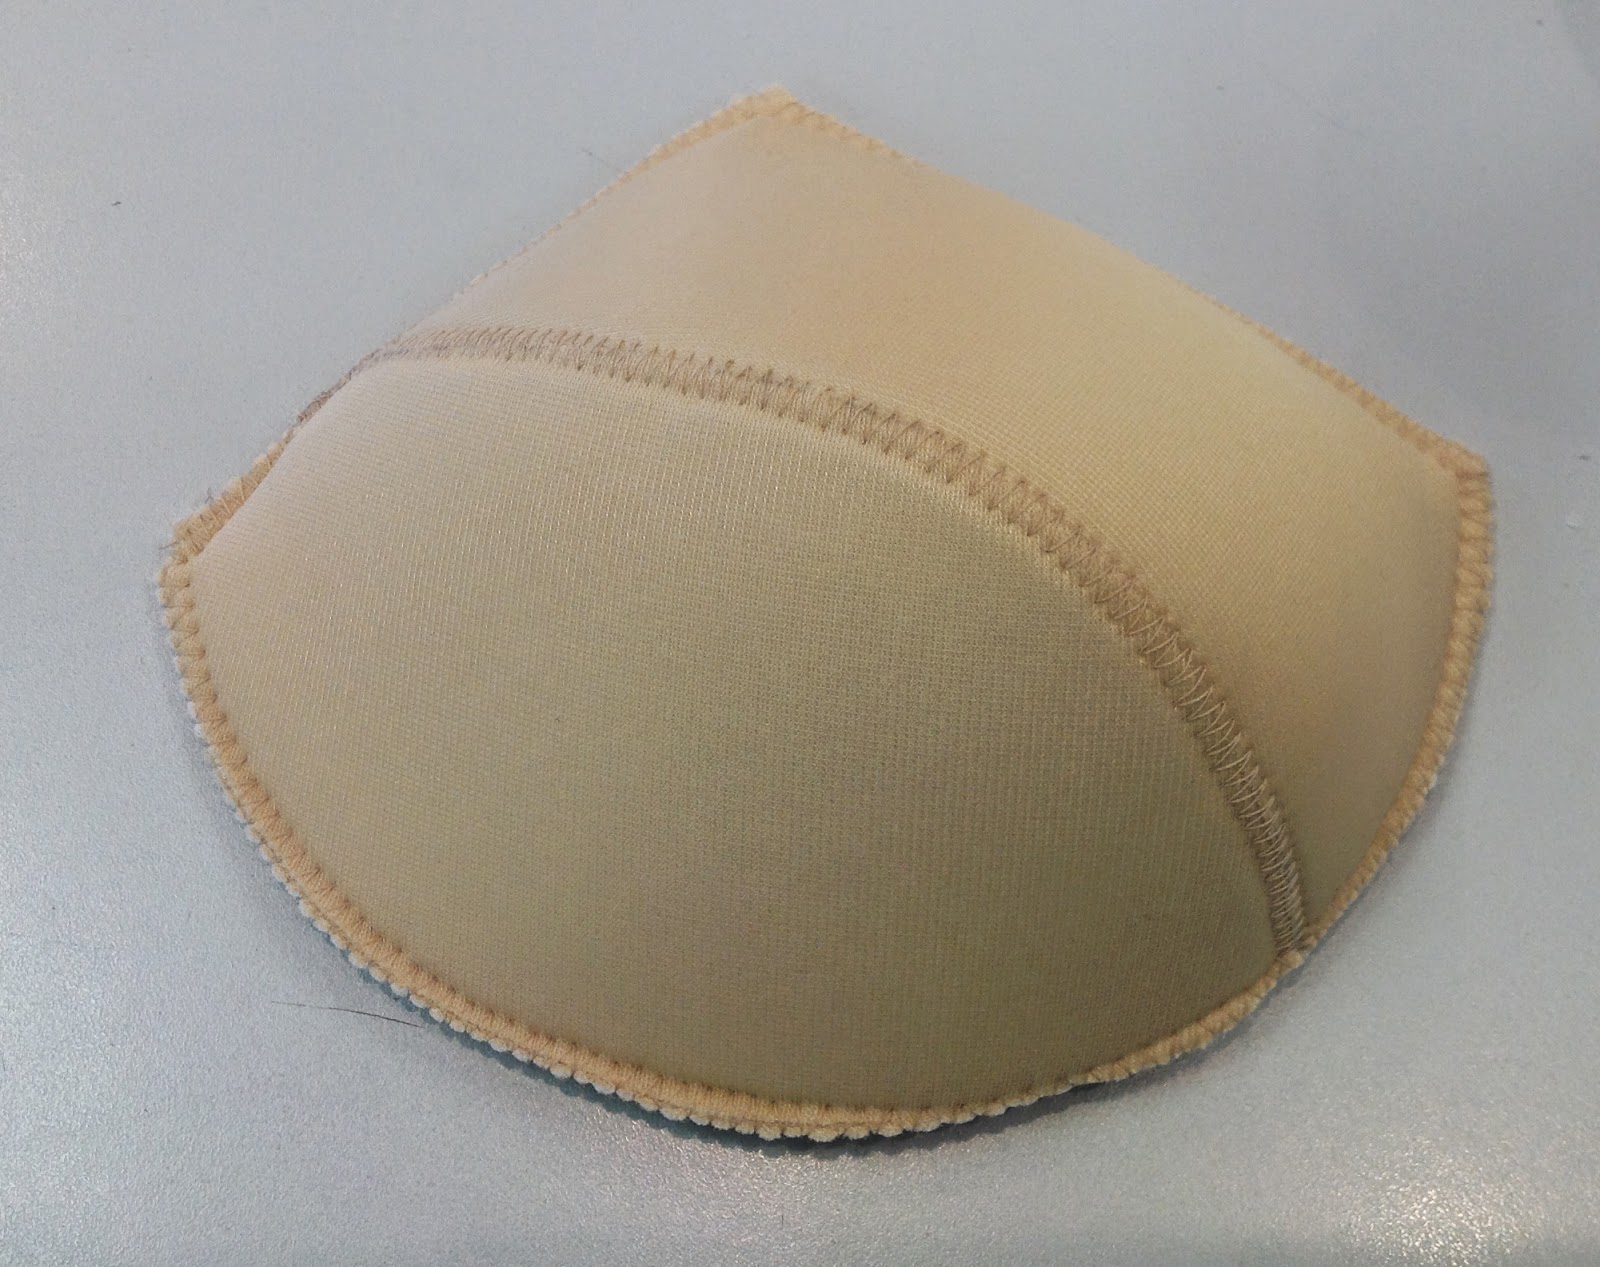
After my rant yesterday, I thought I would share with you how to make a do-it-yourself breast form for yourself or someone you care about. These breast forms are washable as well as being as light as you want them to be. You can swim in them or wear them in a hot tub if you want (without the form exploding and covering the tub with silicone goo). If you are making a bra, they will fit it perfectly. You can make them in any size and best of all, they cost only a few dollars to make, because you do it yourself! This is what it looks like when finished.
To make one, I will assume you have a bra pattern that fits already. You need the upper and lower cup and you will cut them out of sheet foam, also called pre-finished padding, or poly-laminate foam. The foam is chlorine resistant and really easy to use.

Mark 1/4″ (6 mm) away from the cross cup seam only. That’s the one at the bottom of the upper cup and the top of the lower cup as shown here

Cut away the seam allowance

Set the machine to a zig-zag stitch (approximately 6 mm wide and 1.5 mm long). Butt the two edges of the cross cup seam together and stitch, easing them together as you stitch.

With a bit of luck, the two ends will match up perfectly. Sometimes you can make it happen!

Make three of these forms, exactly the same way. Pick one of them to be the outside layer, so that one needs the elastic allowances trimmed from the edges. The prosthesis needs to fit inside the finished bra cup so you can trim off at least 1/2″ (12 mm) from the perimeter. Mark the outside edges of the cup and trim them off.

Each layer will be cut smaller than the one before it, and each layer will be smaller by at least 1/2″ (12 mm). A lot of these numbers will depend on the size of the cup, but this is a good guideline to follow. You may need three layers – more if you want a lighter weight cup, and less if you want a heavier cup.

Now you need to weight the smallest of the cups you made. But first, you need to make a back for it to hold the weights. Lay the smallest cup on the foam and trace the footprint. Cut it out.

Zig-zag the edges of the back to the cup, but leave an opening to fill it along the top edge.

Fill the smallest cup with poly pellets. These pellets are commonly used in weighting stuffed toys or teddy bears, and are available at Michael’s ($15) or in Ontario at Len’s Mills ($5). They are inert, chlorine proof, washable and best of all, inexpensive. The form I am making is going inside a 42C Classic Bra. To start with, I used one cup of pellets.

I pinned across the top and assembled the cup to try it in the bra and on the student.

You can judge the weight fairly easily…just add or take away until your model says the weight feels right! She is the best judge of the weight and firmness.

I took out pellets from the small cup as my model felt it was a bit too firm and did not pass the “hug test”. Women will judge the success of the do-it-yourself breast form if, when hugged, no one can tell the difference between the two sides. I ended up using only one-half cup of pellets (I started with one cup)
I also noticed that we needed some building up in the top of the cup. Generally speaking, you want the weight toward the bottom of the cup, not the top. Since I had removed some pellets, I filled in the space with some foam scraps.and hand stitched them in place.

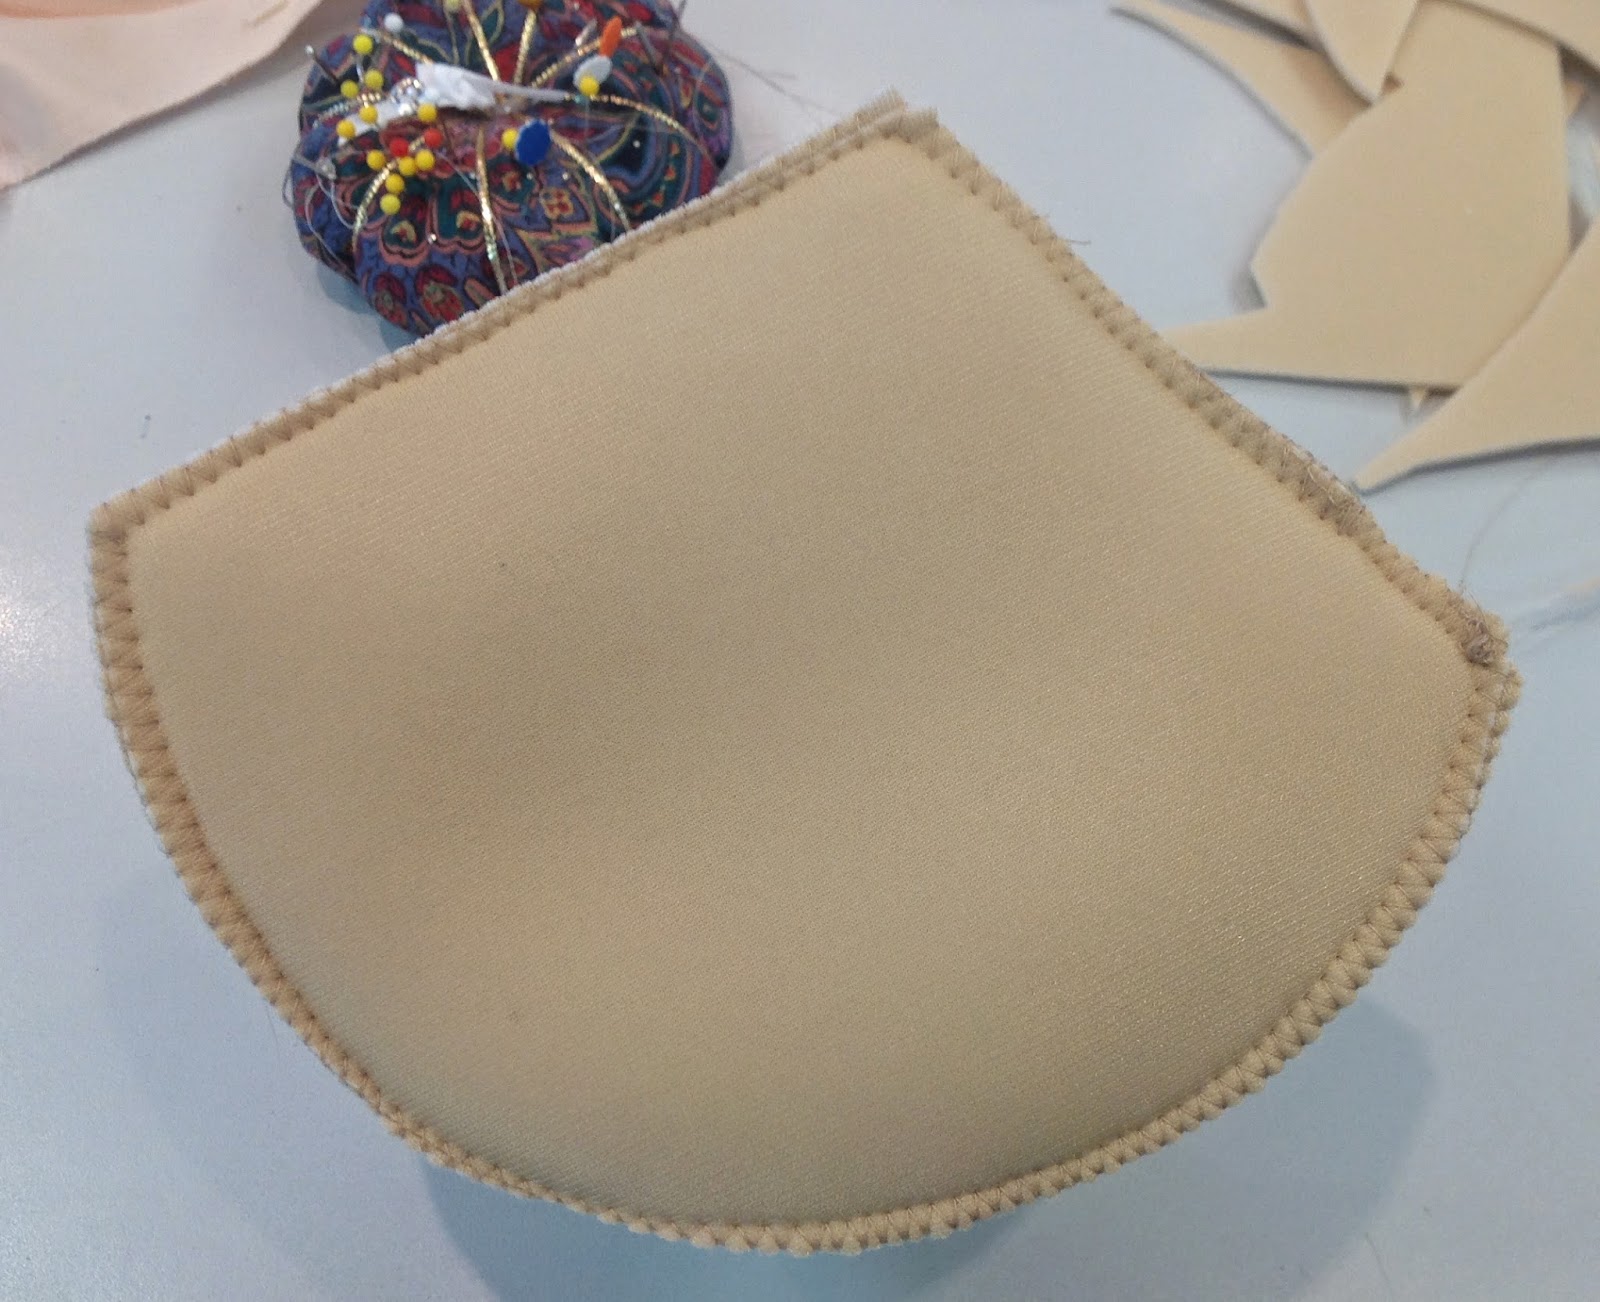
The layered cups from the inside. You can see the three layers quite clearly. If they need to be hand tacked to keep them from shifting, do that now.

Lastly, you need to make the back for the outside (largest) layer. Once again, trace the footprint of the largest cup.

Zig-zag it all around the cup. The breast form is finished!
Here it is from the front. the do-it-yourself breast form looks pretty good, doesn’t it?

Here it is in the bra. The form fits inside the bra cup and the pocket, a piece of fabric that sits against the chest wall, that holds the form from shifting around or falling out. Think of a pocket bra as being a pillow sham. The pillow (the breast form) fits through the opening in the pillow sham (the pocket).
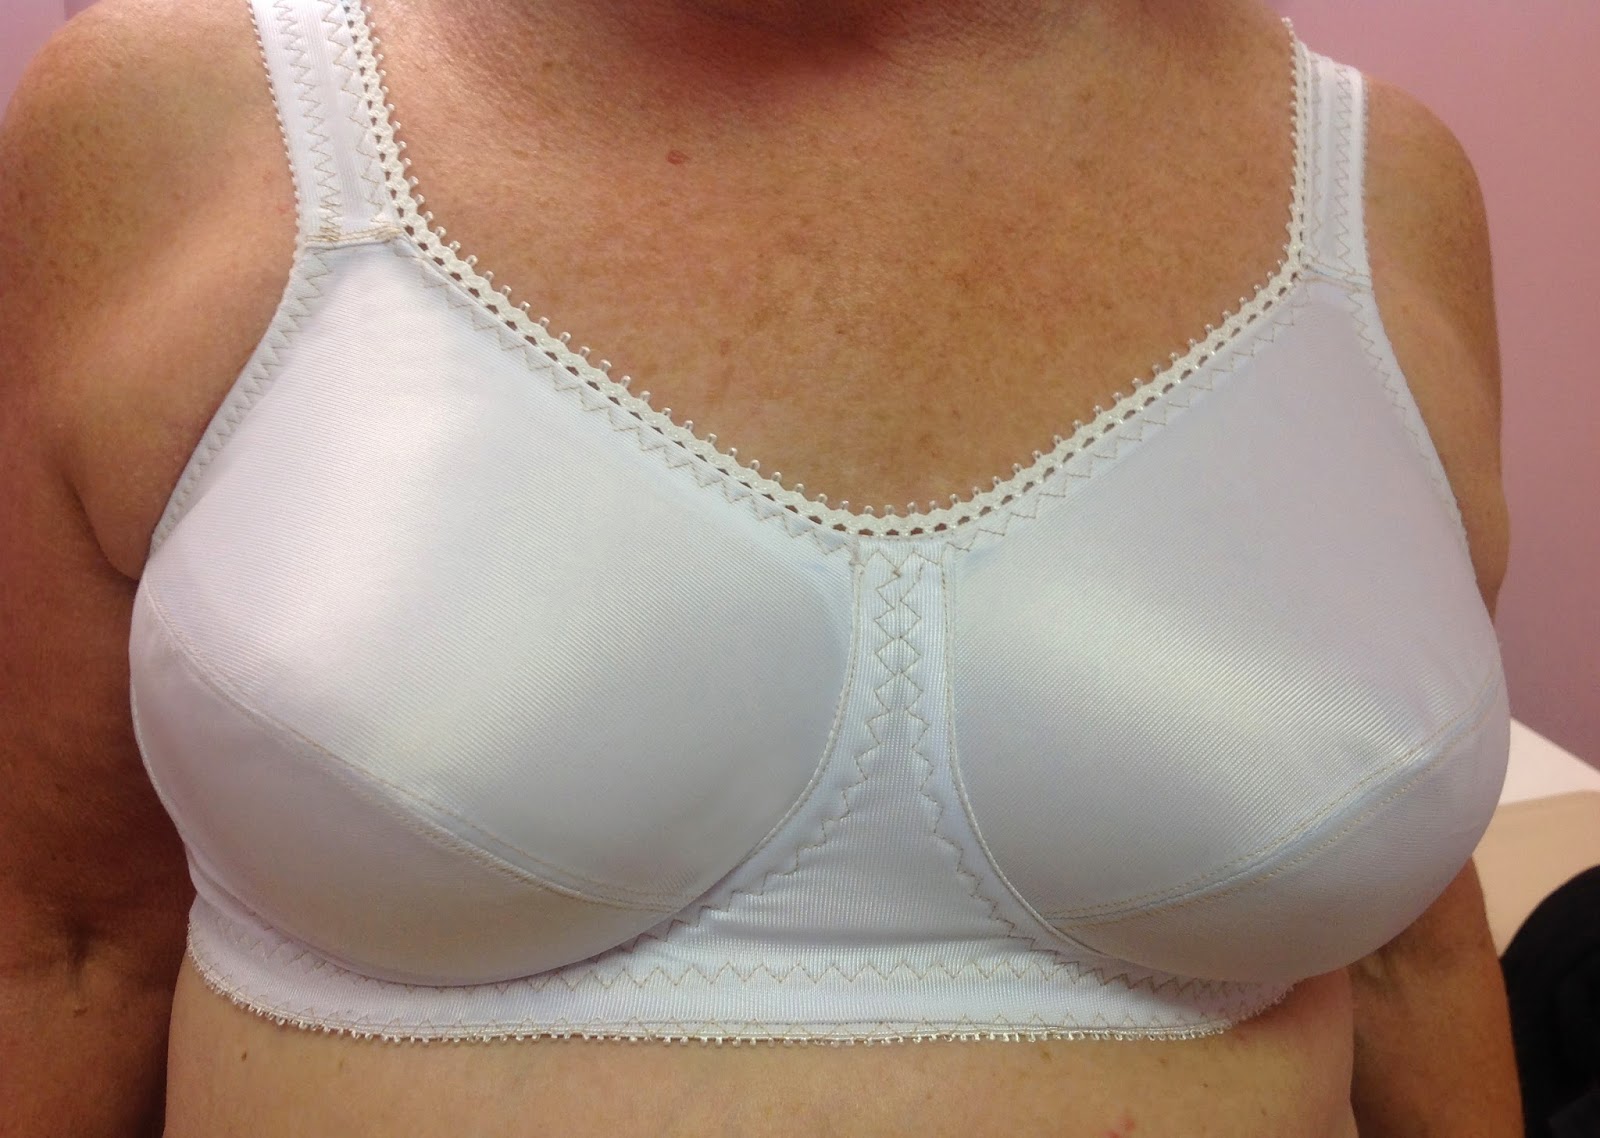
Many thanks to our student in Boob Camp who happily modeled this bra for the picture! Yes, she really did have a mastectomy – although it is difficult to tell which is the natural and which one is the do-it-yourself breast form. The total cost of this form was less than $10 (0.50 for the pellets and $7.50 for the foam). It took me a couple of hours in total to make the form (but I was taking photos along the way!)


I work well with a pattern do you have a pattern with directions available. I’m searching for a friend who had a single mastectomy
No but I did a blog post on how to make a mastectomy pocket for any bra.
I already was a gigantic fan via your craftsy classes (yes I took all of them!), but this is so kind and thoughtful, thank you so much for offering an alternative to the often terrible offerings that are out there. It means so much to me, and I am certain to many other women <3 Bless you!
My daughter had a lumpectomy 20 years ago and has had to use a prosthesis provided by the hospital. It is very heavy and made up with silicone which began to leak. I have been sewing bras for several years using your patterns so decided to look into making a bra and prosthesis for her. I used the Classic bra pattern and used your article on how to sew the prosthesis. I am absolutely delighted to say that I was able to produce a very pretty pink bra with lace complete with a mastectomy pocket and prosthesis which fits her perfectly and has made her feel feminine. She has had to put up with boring plain black or white bras with a very heavy prosthesis and she has had problems when needing a replacement as the NHS can’t afford to change it until it is in the sorry state of being in a flat deflated state hence the need for me to create a new lightweight comfortable one.
I cannot thank you enough for your wonderful tutorial and fabulous patterns. I will be creating many more pretty bras for her.
I am so glad to hear these kind words. Bless you for making beautiful and practical bras for your daughter. Remember if you make the prosthesis from the polymer beads and foam, she can also go swimming or in a hot tub with no problems!
this is a truly wonderful tutorial. although one may sympathize with the ordeal of a mastectomy and the prothesis ordeal, you can not really understand it till you have experienced it. it is painful, demoralizing, and so so scary. I was one of the lucky ones. I have a wonderful husband who was supportive in every way possible. my family was great. my coworkers were fantastic. I have heard so many horror stories from other women about their experience. awful awful awful to think people would be so rude and hateful. I just found your website today. I heard about it from a sewist on you tube that I listen to often. I have wanted to learn to sew my own bras but have been hesitant because of the mastectomy. this is a wonderful place to visit and I will be doing so often now. im in the process of cleaning, purging, and rearranging my sewing room. so will be a little while yet but this is first on my list for when finished. I will be checking out your classes on craftsy or whatever it is now. thank you so much for this wonderful caring lesson
This is great! I had a lumpectomy and although I have a breast prosthesis, I never wear it. I bought 2 somewhat padded bras at TJ Maxx and cut out the cups and stitched the edges. I put one of these inside my bras. However, I think I will make one of yours for myself but without the beads. Thanks so much!
I have been searching for the foam by the yard so I can make one or more for someone i know that cant use a regular mastectomy form bc they are allergic to the latex and silicone forms sold widely. i cant find it in sheet form by the yard, can you recommend a location and or site?
We sell it here on our site in 15 or 16 lovely colours! it is called Cut & Sew foam and you can find it here.
I am in the United States. Is there a way I can order the foam for a breast form? I have a lopsided breast reconstruction and want to try making a custom breast form using your awesome tutorial.
We sell the cut & sew foam yardage in 15 colours. It is 30″ wide so you can get a lot of mileage from 1 metre.
That is a wonderful prosthesis and it looks fantastic! I’ll be making 2 for someone with a double mastectomy.
Do you have any recommendation for that? I’m afraid that the bra might slip up during wear by an active person and wondered if I should use a band of no-slip…? Do you sell such a thing? Thank you!
We do have 1″ gripper elastic but only in white and black. A narrower version in 1/2″ is also available in white, black and ivory. Hopefully, that helps you!
Applause!!!
awesome-love all your tutorials
We have several graduates of our school that would make one for you if you are near to them. We don't make them for customers – we only teach you how to do it yourself in our classes!
hi hon wonderful tutorial thank you so much , how much would you charge for the service of making the bra and breast form and how long does it take please
Honestly, you would never know what this woman had survived by looking at this bra!
This comment has been removed by the author.
I know…this woman's husband was thrilled too. He could see how much more confidence she had!
It's very easy to do, actually. It took longer to take the photos than to make the form.
You are very welcome. I hope this helps someone in need.
The one on the right side of the body (and the left side of the photo) is the breast form we made.
But yes, I agree, it is hard to tell the difference. That's the look we were going for!
I am also shocked at the attitudes of some mastectomy stores…like having cancer is something dirty or contagious. It's time we made our own so we look our best, no matter what!
What a confidence booster for a woman, to look so beautiful !
That is remarkable. You really CAN'T tell the difference.
Thanks! I might try that.
This was the first bra made by this student, and she misunderstood the instructions, I think. It was late in the day, too and she wanted to get it done so she could try it on. But since she isn't wearing any underwires, the stitching is purely cosmetic and not functional. It is more noticeable because we encourage students making their first bra to do the stitching in slightly contrast colour.
That is fantastic. Thank you for the detailed tutorial.
Why is there zig zag stitching on the casing instead of straight stitching?
Wow! I really can't tell which is which! Looks perfect!
Wow! This is a great post. I was shocked at your previous one, about the prostheses. Talk about kicking people when they are down. I imagine that to have a few of these would be great and so affordable. Thank you for sharing it.