Navy Multiple Strap Bra
Time for another peek Behind the Seams! This time, a close-up look at what I call the Navy Multiple Strap bra. This bra was featured in the Craftsy class Sewing Bras: Designer Techniques (I can’t believe there are 30 different techniques in that class!)

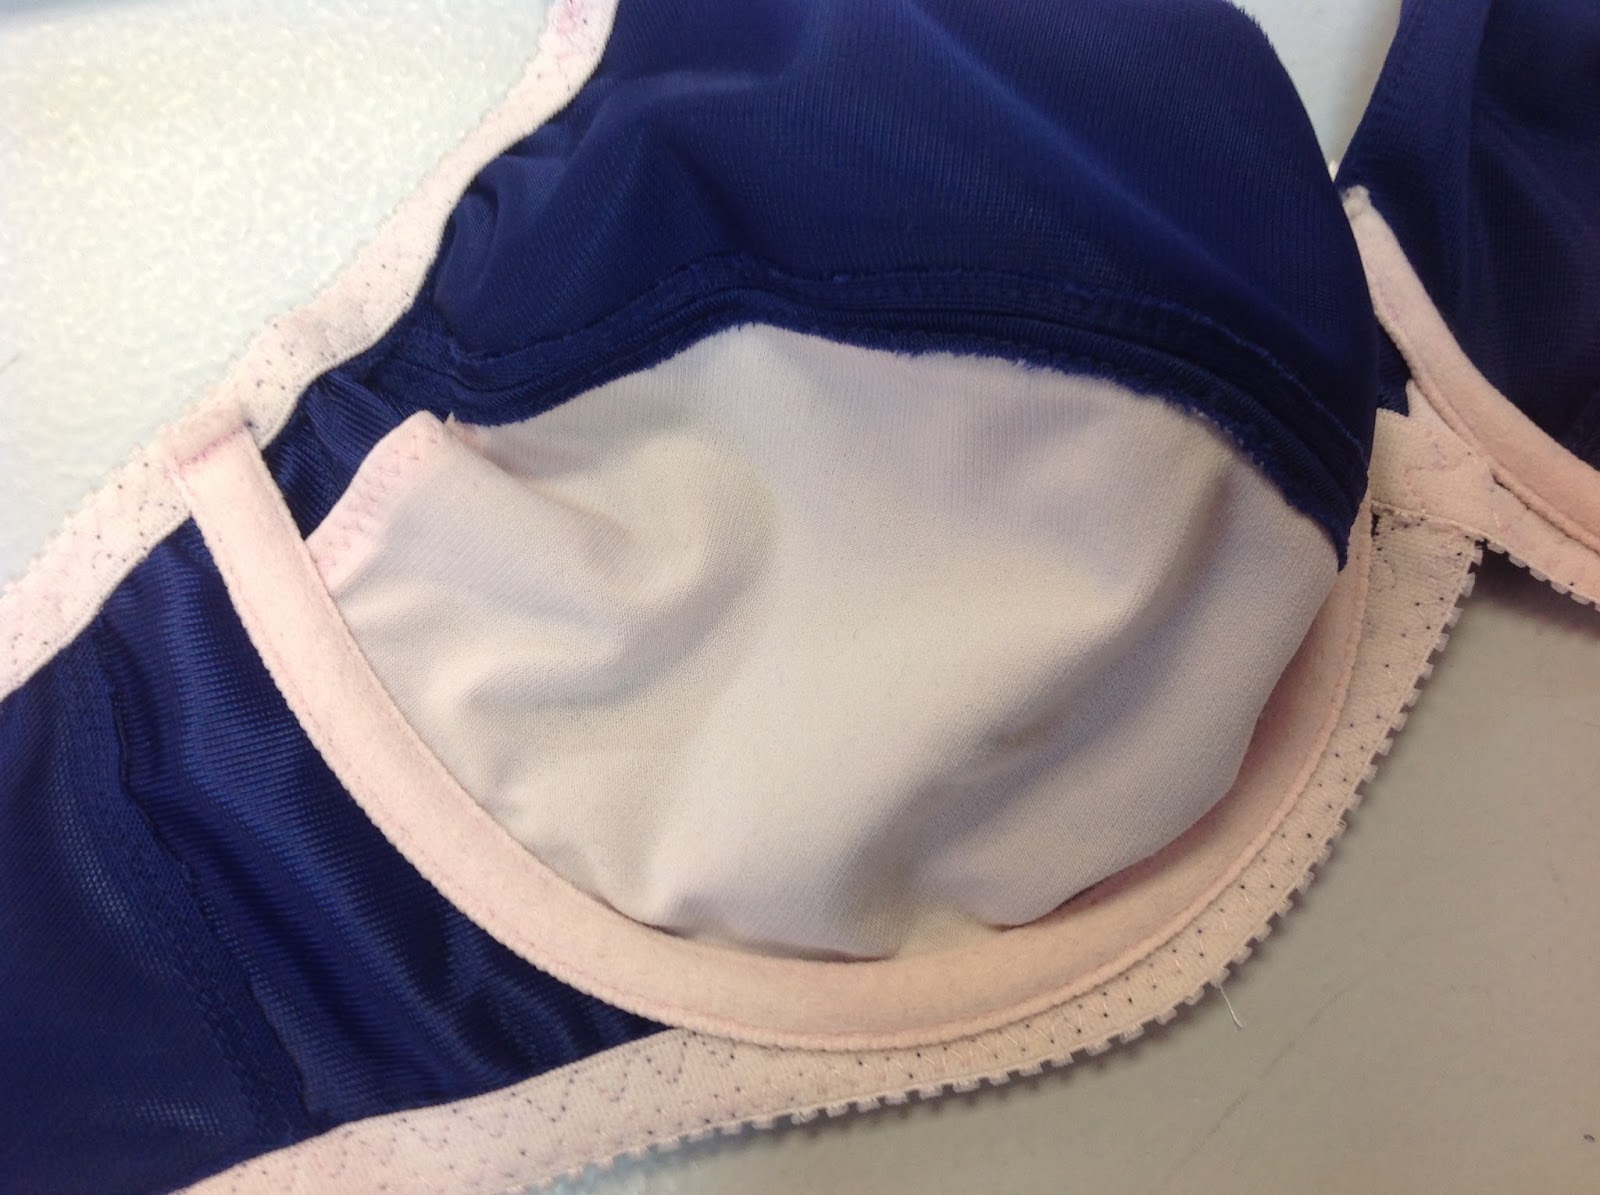
Before we get to the obvious use of multiple straps – let’s have a look at the inside. There’s a Gothic Arch on the bridge! And you can just see – there is NO neckline trim, but it looks to be a seam…what’s up with that? Notice too that the channels have a bartack at the front – that’s because the trifecta kicked in! (more about that shortly)

Also that pink lining is actually a pocket for extra padding.
Features of the Navy Multiple Strap Bra
So the features of this bra include
- 2 ply seamed upper cup
- Gothic arch on the bridge
- Pocket on the lower cup to insert padding
- Thin multiple straps
- The trifecta in action
I might also draw your attention to the fact that while the outside of the bra is navy, the elastics are pink but yet, no thread shows through to the other side. Experienced sewists might know right away we used pink on top and navy in the bobbin to sew these elastics, but new bra-makers might not know to do that. It’s one of those details that sets a professional quality bra apart from the “loving hands at home” category. You may have to adjust your tension slightly to keep the colour from showing through to the opposite side.

The upper cup was cut as a straight top instead of the usual with the strap tab, and cut as 4 instead of 2.

Then we made the tiny multiple straps. In this case we used duoplex which is firm enough that when made into these tiny tubes will resist stretching. The tubes are cut 4 times the desired with, folded in half lengthwise, then each raw edge is folded toward the middle. OR…you can use a 1/2″ tape maker such as this to make the tubes, then fold them in half.

By the way, don’t cut these on the bias – cut the tubes with the DoGS running with the short side.Make 3 for each side
Line up the small tubes on the cup but in 3/8″ from the edge to allow room for the underarm elastic. Space the tubes 1/4″ apart and at an angle something like this so they will be directed to the shoulders and not your neck! (If you have the Craftsy class, there is a template for this in the class materials list)

Only after sewing them to the bra will you attempt to wrangle them into the slider! I like to use three 1/4″ straps as then they will fit nicely into a 3/4″ slider! Also this is where you would sew the second layer of the upper cup to the neckline.

The seam is understitched to the lining side (the inside) so it stays behind the top layer at all times. Understitching is not topstitching – with understitching, no stitches show on the outside fabric.

The Trifecta!
Now that the upper cups are done, lets talk about the trifecta and how it kicked in on the Navy Multiple Strap Bra! A trifecta is a term that indicates a run of three wins or grand events. In the case of bra-making – the three grand events are the finishing of the neckline, the top of the bridge and the straps. (Don’t you love how I take words from the “outside” world and bring it home to us? lol)
If any one of the three areas is finished, you must finish the other two before they can be sewn together. Since the neckline is finished, I had to also make sure the straps were finished before I sewed them to the neckline and I must also finish the top of the bridge. I like to use a lining piece sewed to the bridge and turned to the inside (and that leaves a nice clean edge).
Here’s a tip – if the neckline is finished with lace, or seamed as this navy one, the channel must be finished as shown here – the channel ends and the bartack are exposed.
Compare to the Classic Bra where the neckline trim is applied and turned over the channel ends. I show it here right before the neckline trim is turned. In this case, the bartack will be almost hidden by the neckline trim.

Let’s look at the pocket for the padding. The pocket is made from the lower cup pattern, with some of the underarm end cut shorter and hemmed with a zig-zag or a 3 step zig-zag so the pad can be inserted. Make sure the fabric is stretchy so the pad can be wrestled into the space!

So that is the Navy Multiple Strap Bra! If you have any favourite bras from the Craftsy classes, or from RTW that you would to see Behind the Seams, please be sure to let me know in the comments. I really do read them, and I love doing this series!


I have thoroughly enjoyed the Behind the Seams series and plan to keep on writing them…at least, until I run out of bras!
You are most welcome. Please feel free to share the blog with your bra-making friends!
LooooOOOve behind the seams! Thank you for them. And I appreciate the trifecta! The order of putting the bra together once you venture into design changes can be tricky! 🙂 And the reminder to keep the threads matching if you are using two colors. 🙂 😉
Looove! Behind the seams! Thank you for this. Love the trifecta, because once you venture into design changes the order of sewing can become tricky! Also thank you for the reminder to keep the threads matching the color/side of the fabric. 😉
This is such a great tutorial, as a rather busty woman I can never find bras that fit me well and are cute. Also because I'm busty yet fairly slim, bras that fit well around me AND in the cup are pretty much non existent haha.
I wouldn't recommend such a thin set of straps for the larger breasts, however up to 38D would be fine, I think
Is this type of straps strong enough for bigger breasts too? I'm a 40DD
I make the tubes the same length, then adjust them as I need to once the tubes are sewn to the cup. The inside one (closest to the CF) is always the longest of the three.
I'll be featuring that one soon!
Thank you, I have learn a lott while I was reading your explanations.
This one is really pretty – thank you so much for the details – love the up-close photos here, in the Craftsy classes and in the manuals. It is almost like being there 🙂
So interesting! Looks as if each of the 3 mini-straps is the same length? Do these stay up on sloping shoulders as well as a single unit strap does?
Thanks for sharing all this information!
I love seeing all the details on these! There are sooo many different techniques in your classes, I have watched them over and over trying to get them to stay in my head so I can use them when the time comes. One of my favorites is the red and black lace bra that has the little bit of lace on the strap…just a sliver!
Thanks I'm loving the closer look at these bras!