Peachy Pink Lace Bra
Here’s just the thing for spring – a peachy pink lace bra. This one was featured in the Craftsy Class – Sewing Bras: Foam, Lace & Beyond. Let’s go Behind the Seams to reveal its drafting and construction secrets.
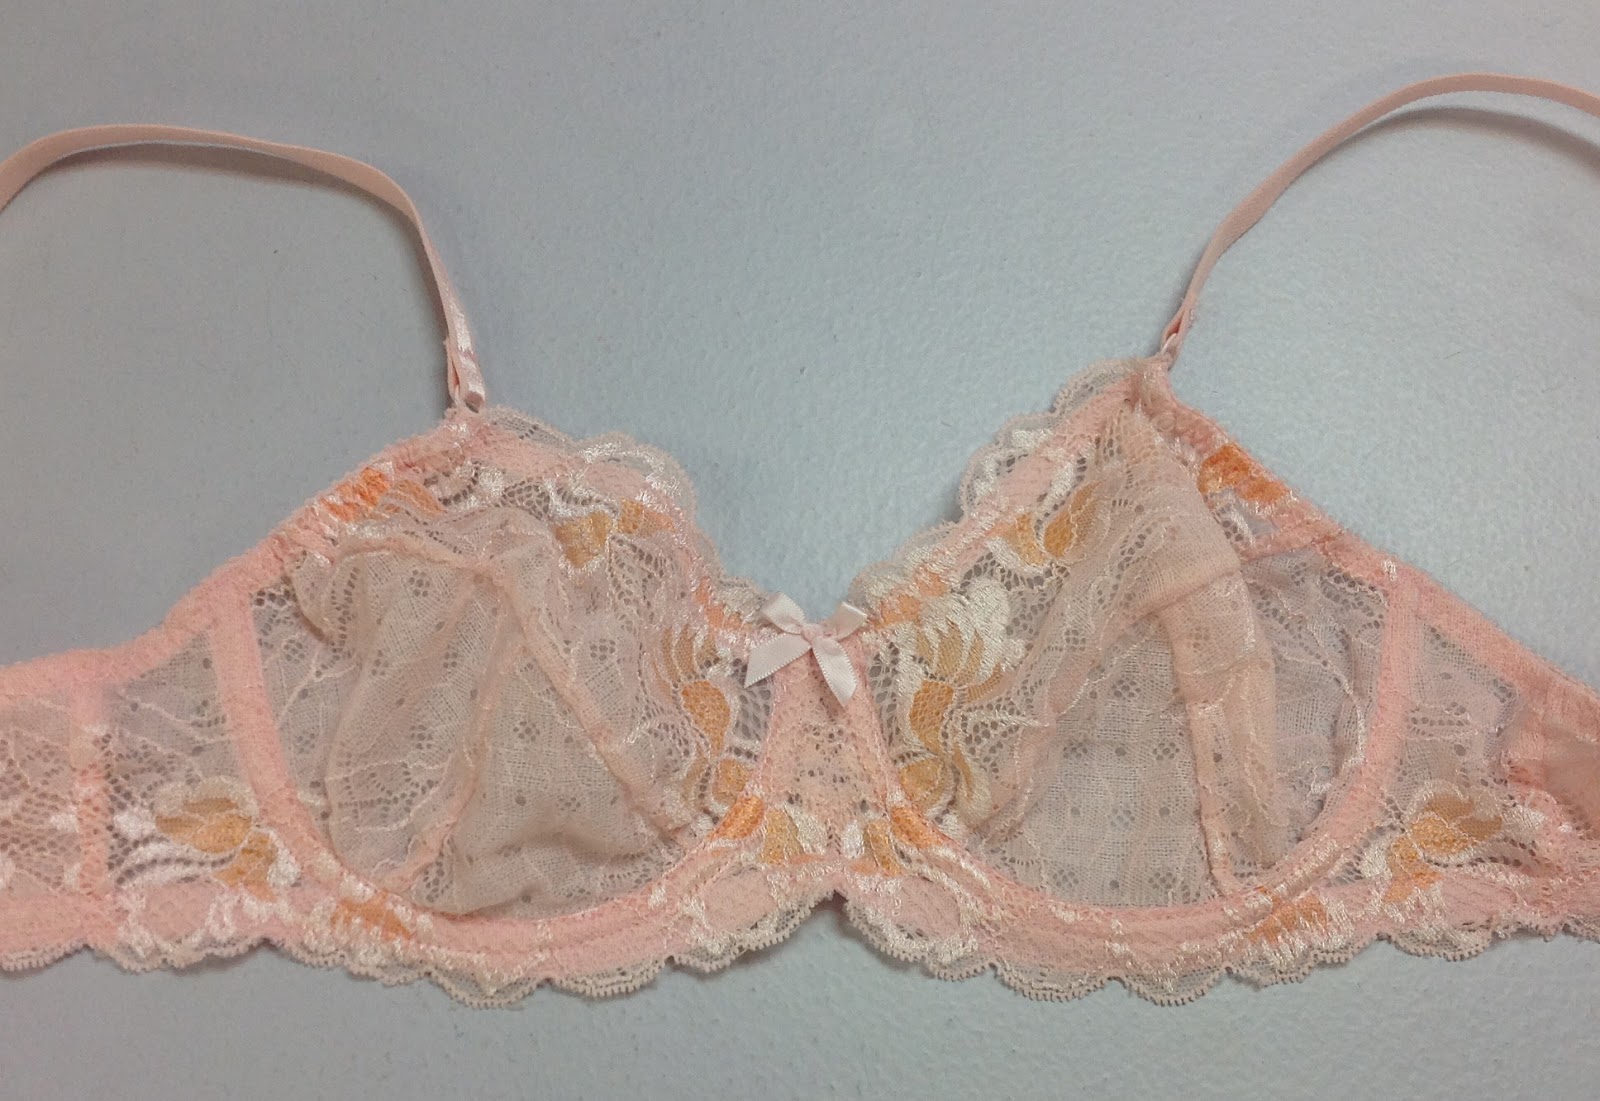
Features of this Peachy Pink Lace bra include
- lace edging on the upper cups
- denier lining behind the lace
- curved lace edging on the front band
- lace edging on the back band
- elastic straps attached to the front with a ring
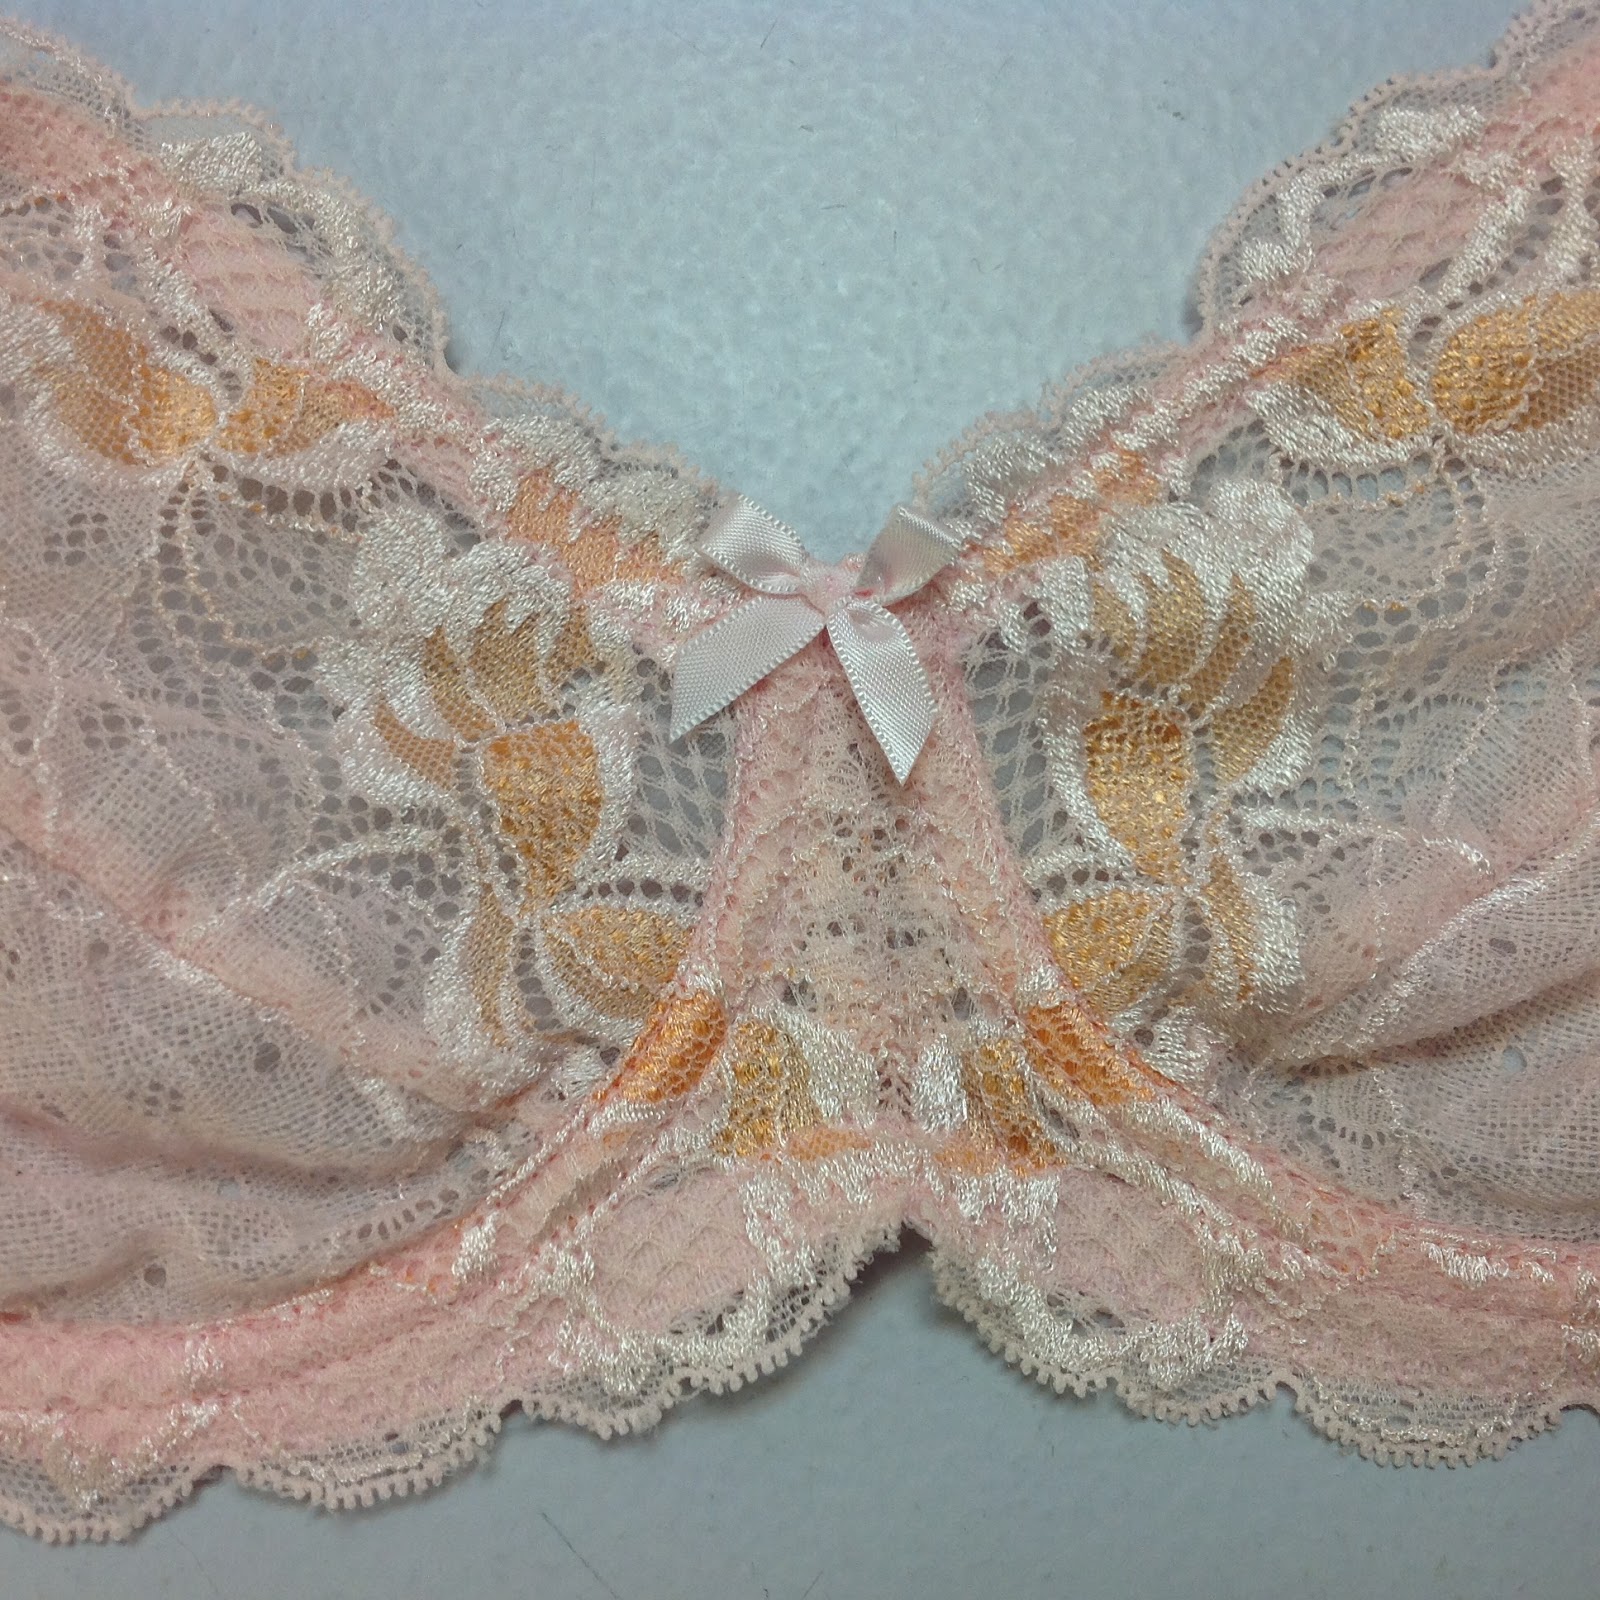
To convert your Classic or Linda bra to accept lace edging along the neckline edge, please see my blog post Using Lace Edging on The Upper Cup by clicking here. Look at how perfectly that lace mirrors at the centre front. Notice also the channel stitching is perfectly parallel and quite narrow – just narrow enough to get the wire in.
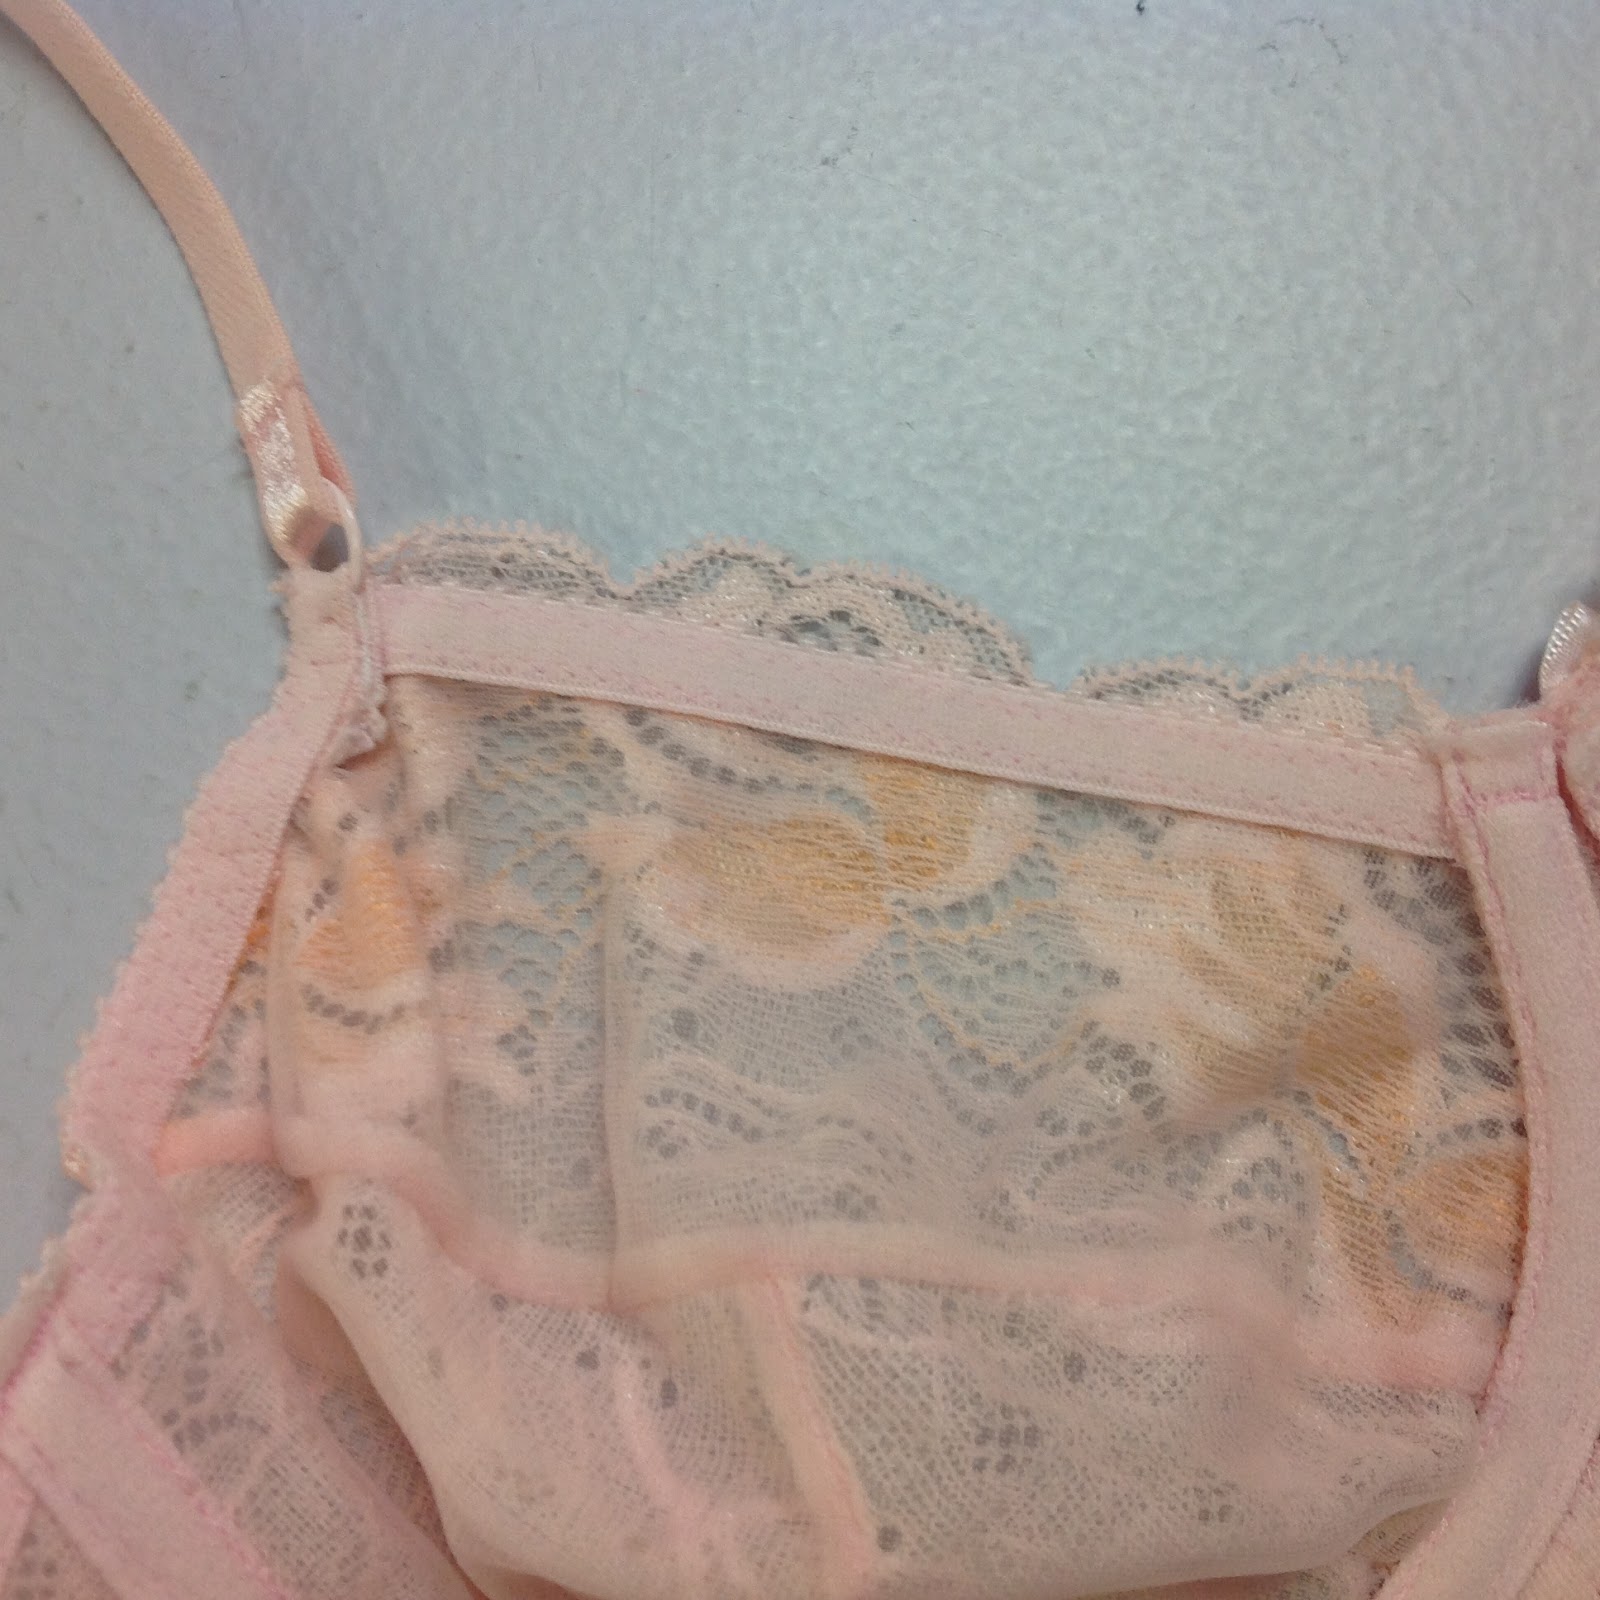
The underarm elastic was left longer and wrapped around a ring on the strap, then stitched down on itself securely. Elastic front straps are only good for the smaller sizes, but larger sizes can immobilize elastic by sewing a ribbon or non-stretch tape to the back side. The stabilized part should be long enough to go over the shoulders by a couple of inches (5 cm). Then you have the look and colour of the elastic strap but not the stretch in the front.
The cup is lined with 15 denier nylon sheer fabric and the raw edge of denier along the neckline is covered with elastic trim. You could add stabilizer under the elastic if necessary. The denier has some mechanical give in one direction so it is good behind stretch laces if a lining is needed. It is sewn with what I call the stitch & flip method. (I have heard frustrated sewers call it “the flippin’ stitch” but that is another story!)

The lower cup seam was sewn with a S&F seam first, which automatically encloses the seams. Then the upper cup unit is sewn to the lower cup unit. When you have a S&F seam, the seams always turn to one side. Pay attention to which direction you want the seam to turn. I almost always want the lower cup seam to turn into the upper cup because it lies more smoothly. There are exceptions of course, but in this case, to turn it into the lower cup with that seam already there, would have been too bulky.

The lace for the back band was layered over stretch mesh. Stretch mesh, a nylon spandex blend can act like a lightweight power net if you use two layers. This is one layer, and is quite sheer. Wow, my fingers really are short!

Here’s the side seam. The lace repeat joins exactly at the side seam so the scalloped edge is continuous. How did we do that?

How to Match the Lace at the Side Seam
By ending a lace repeat at the seam line, not the edge of the pattern piece, we can ensure that the lace will match perfectly when the seam is sewn. On my bra patterns, the seam line is 1/4″ (6 mm) from the cutting line.

Then when the seam is sewn, at the sides and the centre front, the lace repeats will match. So the scallops will carry on without a break. In a perfect world, the lace repeat will also be 1/4″ in from the centre back too, but that’s not always possible.

Only after the seam is sewn, should you sewn on the bottom band elastic. The elastic in this case is only sewn flat, it is not turned over as in a traditional construction.

Almost forgot…on the inside front channel closing…you have to leave the channel end exposed and bartack on top. Since the elastic trim was applied to the upper cup edge first, then the finished bridge sewn to that – there is nothing to turn over top of the channel end. So the end of the channel shows and the bartack closes the channel and keep the wire in. Don’t worry – have a look at any lace edge ready-to-wear bra and you will see the same thing (maybe a wee bit neater, but still…)

Here’s the finished Peachy Pink Lace Bra back…

…and the front! It always looks better on, than just lying on the table, doesn’t it?


Great blog! Nice bra. Thanks for sharing a great blog.
Great blog! Nice bra. Thanks for sharing great blog.
How was the side seam finished? I am so glad I found this post. I was just looking at a RTW all lace bra and was trying to figure out how the cup seams were finished. Thank you!!
It is sewn with what I call the stitch & flip method. (I have heard frustrated sewers call it “the flippin’ stitch” but that is another story!) The stitch and flip method encloses all the seams in one pass.
Beverly, I have some lace that is not stretch lace although it does have some give. If I lined it with the sheer cup lining, could I use that for the cups and frame, with power net for the band?
That sounds perfect!
Reading this I realize I messed up the bra I’m working on right now. I made the seam go to the bottom, and I made a split cup. Ah well, I learned. This is Duoplex and lace only on the upper cup, my first bra made with lace, and the lace is over Duoplex and not a sheer fabric.
One thing that is confusing me is the stitch and flip on the cup construction of the peachy pink bra. What I think I am seeing and understanding of how this cup was constructed is that all four layers – 2 of lace and 2 of denier – are pushed to the upper cup on the cross cup seam, and to the side on the lower cup. This means that there are no raw edges on the inside of the cup against the skin, and the lace and denier all together are not thick enough to be too bulky in that seam. Am I correct?
Yes, your interpretation of the stitch and flip technique is correct. All four seams are sewn at one time, and when the layers are turned, the seam will be inside. You can do the stitch and flip so that the seams stack on the upper cup or the lower cup. For me, the seams lie smoothest when they sit in the upper cup
Thank you, Beverly! Love your Craftsy classes and this blog, the only problem is I have been sitting here all morning watching and reading and learning and NOT sewing! So much information here, this post is excellent, thank you!
This was not a Shelly but a Classic with a split lower cup, lined with denier and covered with stretch lace. It is amazing how different a pattern can look when you use different fabrics and a few different techniques!
So beautiful! Was this the Shelley? I can't wait to try my hand at sheer cups. Thank you for sharing!
You are most welcome! I am happy that bra-makers are enjoying them!
It's a stretch lace lined with 15 denier nylon tricot
Did I miss it or was there no info on getting the curve and gothic arch to the lace of the front band? In the illustration of the frame it looks like the wire line is flatter. And it also looks like there is a seam in the centre front of the bridge. Just curious about this since I love doing gothic arches on my bras!
This particular bra ha no Gothic Arch but you certainly could do one on your bra if you want. The lace itself is seamed but the elastic is what makes the Gothic Arch. I’ll have to do a post on Gothic Arch construction!
Nice bra, thanks useful instructions.
It's a stretch lace lined with 15 denier nylon. I like the denier behind stretch laces and sheer cup lining behind rigid laces
Is this lace stretch or rigid? I'm not sure from reading the text. Very pretty bra though.
You know you can make one just like it!
If you can sew, you can make a bra just like this!
This bra did not have a Gothic Arch. However the Navy Multiple Strap bra did have a Gothic Arch and I did a blog post in April on this very bra
http://bramakers.blogspot.com/2016/04/behind-seams-navy-multiple-strap-bra.html
You are very welcome!
Great tips, Beverly! Thanks!
Wow – what a pretty bra! Great tips. ( no pun intended) Thanks
This is beautiful. I want one.