Two days of making swimwear started today at the Saskatchewan Stitches Conference. The students were told that there were several ways of supporting the bust in a swimsuit; shelf bras, pre-formed cups and free-floating bras. let’s look at each of these.
1. Shelf bras, which are a piece of fabric in the front of the suit with a few gathers along the bottom edge. This type of shelf bra is not good at supportive a larger bust or one that is flaccid or heavy. I rarely recommend this type of support.
2. Using pre formed foam bra cups sewn into the suit lining. The cups aren’t bad as long as you can get them in your size. However, you are limited to the shape of the cups that are available.
3. Free floating bras. These are the best solution, in my opinion. You can use your own bra pattern and make the cups for inside the suit. The bra attaches at the side seam and the shoulder of the swimsuit, and is not visible from the outside of the suit. There is no limit to the size, and the cups can be underwired or not. Best of all, it supports as well as a bra!
So today after the students were measured and assigned a swimsuit size, they got to work making their free floating bras. Some got right to work!
Margaret was working on a client bra in the workroom, although I did get her to pose for a photo. And you can see the tennis balls on the chair legs to keep them from scratching the floors,
Here is the inside of the cup we are making. We use cut and sew foam to make the cup from the bra pattern, then cover the seams with seam tape. Don’t have any seam tape? We used duoplex cut into strips, and that worked just as well!
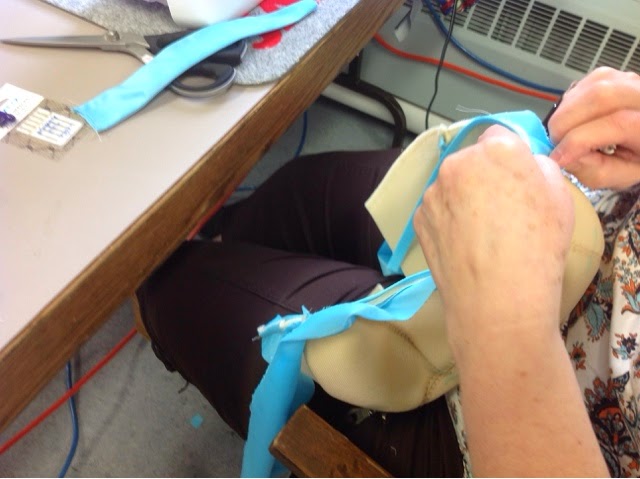
Once the cups were sewn, they were inserted into the frame, and elastic put on the bottom edge, just like in a regular bra. You can see a bit of the blue frame in this photo.
We also made some straps to attach the cup to the swimsuit shoulders. You can use strap tape, or you can make tapered tubes from duplex. Either way, it works!
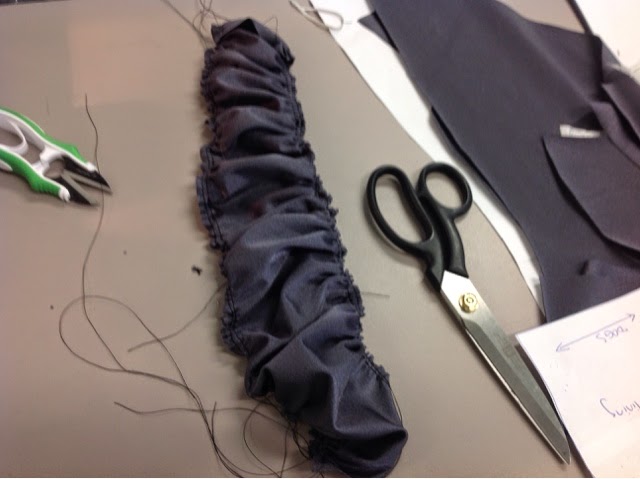
One student finished her cups and was ready to start the main part of her suit. She wanted ruching on the side panels of her princess line suit, so I showed her how to make the pattern piece for it. Here it is in the beginning.
Here is the ruched panel after gathering and pinning it all in place. Next she will sew it and steam it before it can be sewn into her suit.
Tomorrow we will finish the suits and insert the free floating bras. I have some tricks to make that part of the fitting go super smooth. Stay tuned to see the final results!


Thanks for showing this, Beverly! Do you think a free-floating bra could be sewn into every-day t-shirts and blouses?
I have been searching for an alternative bra to work around nerve damage in my brachial plexus, and I’m wondering if a free-floating bra could be a solution.
Thanks!
I wish I could! But my magic doesn't work like that!
Good to know. Thanks Beverly! I would love to take one/all of your classes one day but you're so far away. Can you wave your magic wand and transport me there?
Yes, both swim cup foam and cut and sew foam are chlorine resistant! Both are available at http://www.bramakers.com
Cut and sew foam also called poly laminate foam works well, as does swim cup foam
What a great idea. Thanks for sharing. Is this a special type of foam that can stand up to chlorine? Or will regular cut and sew foam do?
They are going to be lovely!
Love the side inserts !