Heather in Red and Black
With the launch of the most recent online class through Craftsy, I decided to do a regular blog post on the bras created for the lessons. But you may not recognize some of them…as I will be featuring them in a different colourway than was used in the filming! This one for example is the Heather in Red and Black! That way, not only you will get an inside peak at the techniques that I am demonstrating in the class, but you will also see other colour ideas. Hopefully it will spark you to make your own version!
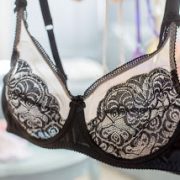
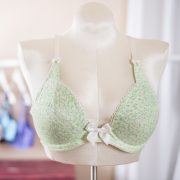
The very first Craftsy class was Sewing Bras: Construction & Fit, and the very first bra everyone asked about was what I would call the “Heather” Bra, and that’s because the model Heather wore it in the first lesson so I could take measurements . You might remember that bra from this photo:
That Heather bra was a ready-to-wear bra that we bought just to show the measuring process. I had so many requests for the instructions to make this bra that I decided that I had to duplicate the bra and feature it in another class. And the Heather Bra was born!
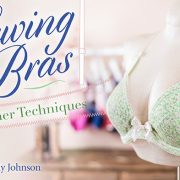
Here it is from the Craftsy class 3 Sewing Bras: Foam, lace & beyond. Their photographers are way more skilled than I am, so this is a great shot! You can see the lace is similar, but different than the original. That’s ok. I only wanted the light and delicate look of the original.
So here is our new Heather in Red and Black bra created just for Valentine’s Day! Created by Linda Crawford of Uplift Custom Bras, it is the Heather but instead of using black lace over light beige sheer cup lining, it is red and black lace over black sheer cup lining. The bra looks totally different!
So what makes the Heather bra look so different from the Classic Bra? The extended strap tab, the horizontal seamed cup, not to mention the base fabric of sheer cup lining with a lace overlay. While the lace overlay will work on a diagonal seamed cup, it is especially effective on a horizontal cup. I’ll detail how to make a horizontal cup in another post (soon, I promise!)
Let’s look at how to make an extended strap tab. The Classic bra often has a rectangular shaped strap tab coming off the upper cup where the fabric front strap will sew. You can change that strap tab to an extended version by drawing a line from the seamline at the apex to the centre point of the strap tab and beyond.
Next draw a line parallel to the strap as shown at left below. Make sure the new strap is the same width as the old strap and centre it on the line you drew from the apex. This will ensure that the strap is still heading toward your shoulders. Then connect the ends of the line to the top of the cup on both sides as shown at the right.
Next overlay the lace to the upper cup once the cup is cut out of sheer cup lining. Our Heather bra used beige sheer cup lining but Linda did hers with black. Sheer cup lining has holding power that other fabrics do not possess, and it is wonderfully stable as well as strong.
Overlay the lace something like this, starting in the armhole curve and ending the lace back a little from the front edge of the cup. Why? It makes the lace look like it dips well below the seam…for a sexier look!
Sew the lace across the scalloped edge with a small zig-zag or even a straight stitch if the lace is rigid. Complete the bra as you normally would.
Finish with the elastic trim on the neckline as we did or use fold over binding as Linda did. If you use fold over binding as an edge finish, remember you need to remove the seam allowance before you start. Fold-over binding actually folds over the raw edge of the fabric so there is no need to have a seam allowance.
I hope you have enjoyed the first in what I hope to be a regular blog post. if you have any ideas of what bras you would like to see featured, or bras from ready-to-wear that you would love to see behind the seams, please let me know. Really. let me know! Blog posts are written for you, my readers and I would love to know what you are missing from your bra-making expertise!
With the Heather in red and Black, I wish Happy Valentine’s Day to you! Happy Bra-making from your Fairy Bra Mother.






Linda is a 5.5 and it worked well for her. Try two layers of sheer cup lining, not 15 denier. People often confuse the two! But I advise getting your sizing down pat first. Even Linda with all her experience and expertise, had to revise this a little once she tried it on the first time.
Beverly, will the sheer cup lining work for a 36 band and cup size with a BCD of 6.5-6.75 (still working in my correct size!)? I am not self-supporting whatsoever and regular tricot, even with opposing DOGS, isn't really enough to hold them up.
Would this work?
15 denier will work except you may find you need two layers of denier, and cross the DoGS in each layer for maximum support. Your bra design sounds intriguing! If you are using stretch laces, fold over binding might be a little heavy but if the lace were lined with something,the fold over might be just right!
I have one pattern for a body suit, called the Ova-Bra Bodysuit that in its original state is meant to be worn over a bra. However in our advanced classes, I teach how to insert the bra frame into the bodyshaper frame to make an all-in-one bodysuit with bra built in. It doesn't have a hook and eye in the back, but pulls up over the hips like a bathing suit.
Yes, yes, I do want to make a Heather. Will 15 Denier work in place of the sheer cup lining?
I just ordered and didn't get any of that.
You may be sorry you asked, but here is my latest brain child of bra design. A sports bra style with a stretch lace and stretch mesh back that crosses over like a wrap dress. A hook and eye front closure, and a princess style in the front. Perhaps a full sling versus underwires. What I am pondering is finishing the edges of this concoction. Fold Over Elastic, kinda heavy? Any thoughts on this and also the order of construction. Thx so much, I love your courses and your blog.
That's a great idea, Kimberly! In the meantime, use sheer cup lining (.4 metres), rigid lace (1 metre), duoplex for the frame ((.25 metres) and power net for the back (.3 metres) You can use any findings kit that you feel is best with the combination of lace and sheer you choose.
I know you will love the Heather! Try it and show us the results!
Wonderful post!
I've been thinking about body suits… I had one many years ago when I was a wee B cup, but now that I'm a D/DD I need a bit more support. I've seen pictures of an Empreinte where it looks like a bra frame was maintained with the "body" part of the suit added over top like a second layer (if that makes sense). I couldn't see the back, so would one still use 2 or 3 hook and eye closure? What would the back look like? Thanks for all your help! You are a great resource and provide a great service to boobs all over the world!
That looks beautiful, and now inspires me to try this style when I feel a bit more confident in my bra making skills. Thanks for the tutorial.
Thank you for the tutorial. Could you please put together some fabric pack kits of the sheer cup lining, lace, bra band fabric, and power net, with recommendations for findings kits? That would make this and similar lace over sheer cup lining bras much easier for me to attempt!